
How to Make Wavy Border Strips
August 13, 2020

Hi!
We’ve all at some time or other made wavy borders, and they have been of the unintentional and have-to-fix-them-before-you-quilt kind, and this post is NOT about them. That’s all do to with measuring and not stretching fabric, and whilst this technique is similar, it’s definitely more fun, and way more effective on your quilts.
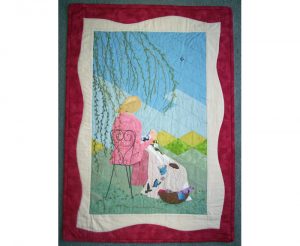
This technique is how to add a two-tone curvy/wavy border to your quilts. It is easy to do, with minimal measuring.
Here’s how: (These photos are an example from our “Willow Quilter” BOM.)

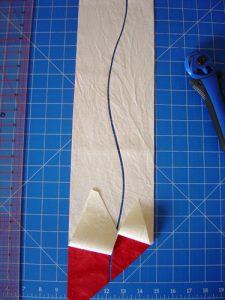
For example, cut a strip of red fabric 4½ inches wide, the length of your panel side plus 9 inches so that it goes well beyond the ends. Cut a strip of cream fabric the same size. The two side borders are made together, as are the top and bottom borders as follows.
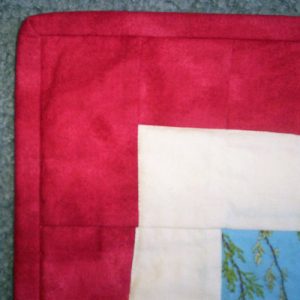
Lay the two side strips (one red and one white) one on top of the other exactly, RIGHT SIDES UP. If you can mitre the corners, that gives a good effect to the wallhanging. We just filled in the corners afterwards with adjusted cornerstones, as shown in the last photo.
To get mitred corners to fit well, you must start and end the wavy cut exactly halfway across the strip.
Use the rotary cutter and cut up the length of the two pieces with a gentle curve to the left and the right.

The more shallow the curve, the easier it will be to sew together.
If your cut goes straight for two or three inches at the beginning and end of the line, it will be easier to mitre the corners too.

When the cut is complete, lift off the top left piece and lay it alongside the bottom right hand piece and vice versa. They will match exactly – half red, half white.

Sewing:
Flip the pieces over to place right sides together to sew.
Pin the ends, and perhaps one or two other places along the length.
A tip that may help is top use a little bit of sticky tape across the tops of the hills or bottom of the valleys before you put the two pieces right sides together as shown.

Another tip is to use spray starch. Starch both pieces before you start cutting, then they will hold their shape and not stretch when you are sewing them together.
Don’t panic at this point. It looks all wrong. You’re trying to sew a hill to a valley, but the trick is to go very slowly, don’t pull the fabric much, just match the edges ahead of the machine needle. Do a few stitches and then you may have to lift the foot and turn your work a bit with the needle in to continue with another few stitches. Be patient, work slowly and you’ll easily turn out a perfect wavy border.
You can mitre the corners on a 45 degree angle if you like or fill in with matching keystone squares as we did.
If you choose to use a cornerstone in each of the corners, you may like to piece three red squares with one cream one, or, as we did, play around with these smaller blocks to keep the curves smooth.

Now you can go try this out on a new quilt project!
Remember too, if you’re after more quilt projects to make each month, our Much Bigger Premium Online Quilt Magazine is packed with projects! Upgrade today at http://www.OnlineQuiltMagazine.com
Enjoy!


I love to learn new ways of doing thing.
I will love te learn new
Good
Have never done this curved border but will try it now. Thank you.
thank you so much for sharing and teaching this idea..I just love it..will give it a try
Nice dimension to the wall hanging. Thanks for sharing.
You’re welcome! Hope you can use this idea on a quilt project.
How do you account for the fact that the matching edges are on the cutting line rather than on the sewing line? I would think this would distort the curves.
Hi! Good question. As they’re cut together, both edges are the same length, and so the seam allowance is included. This is on both halves, so it’s taken into account. Sew the curves carefully without stretching the fabric, and the go together perfectly when you use a consistent 1/4 inch seam. A good tip is to spray starch the fabric first before cutting, then when you go to sew the curves together this helps prevent any stretching.