

Exploring Blocks Sampler Quilt – Month 4
October 25, 2023

Hi!
Can you believe it’s the end of the month again? My goodness, October went fast!
That means that it’s time for the next of our blocks for our Exploring Blocks Sampler Quilt, and this month it’s the classic Ohio Star block.
Here’s what we’re working towards:
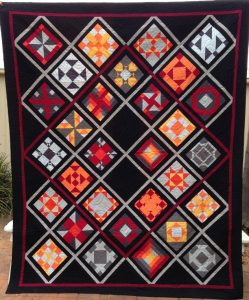
We will be making blocks for 9 months in total, and then putting them together into this quilt in the tenth month.
Rather than repeating the fabric requirements each month, refer back to the patterns in Months 1 or 2 (previous blog posts) for the fabrics that you’ll need.
Block 4 – Ohio Star Block

You Will Need:
Three (3) fabrics that contrast. We used silver, red and yellow.
* You will need to make FOUR (4) of these 10 inch Ohio Star blocks for your Exploring Blocks Sampler Quilt. Refer to the rotary cutting guide below for cutting directions and quantites for EACH block.
Cut:
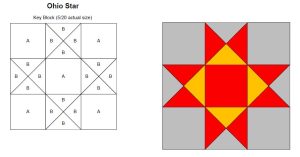
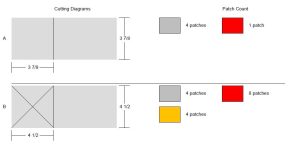
Assembly:
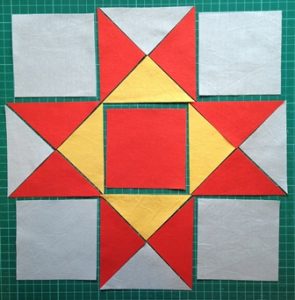
Lay out each block as shown.

Start by piecing the points of the star into pairs.
Join in pairs as shown, and press well with seams facing in opposite directions.

Then join the sets of pairs together to complete each of the star point units.
Press well.
Now it’s just a simple 9-patch block.

Piece the units into rows and press seams in different directions, alternating between the rows.

Finally sew the rows together and press well.
Make four (4) of these Ohio Star blocks.
Repeated, this block shows more diamonds than stars, or separate out for clearly defined star blocks.


4-Patch:
And now let’s play! This block can also be cut into a 4-patch block, the units rotated, and re-pieced, for a completely different block.
We’re going to try a couple of different variations on this theme, this month.
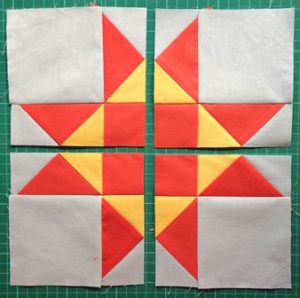
Cut one of your Ohio Star blocks into 4, as shown.
As your finished block should measure 10½ inches square, you should be able to cut in half vertically once at 5¼ inches, and do the same horizontally.
However – if your block is slightly out, don’t worry – make the cuts so they run straight through the centre square and through the middle of the star points as shown.

Rotate each quarter 180 degrees, so the star points face inwards, as pictured.
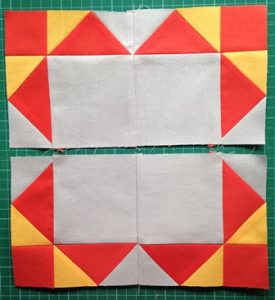
Join the units into pairs and press seams so they face in opposite directions.
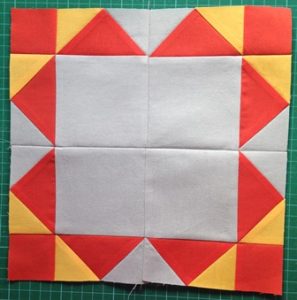
Join the pairs together to re-complete your block.
Also – as you have cut and re-pieced your 10½ inch block, the finished block will now be about a ½ inch smaller all round.
This is fine, and we will take it into account when we put the quilt together.
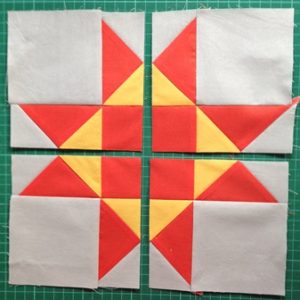
And now we make a second 4-patch variation!
As before, cut one Ohio Star block into quarters.

This time, rotate the top right and bottom left quarters as shown.

Piece into pairs and press seams in opposite directions.

Join the pairs to reassemble this block into your second 4-patch variation.
9-patch:
And don’t stop there! Now let’s try a 9-patch as well!!

This is not an even 9-patch.
Measure out ¾ inch from each side of your centre square and cut the block twice horizontally, and twice vertically, to make it an uneven 9-patch.

…like so.
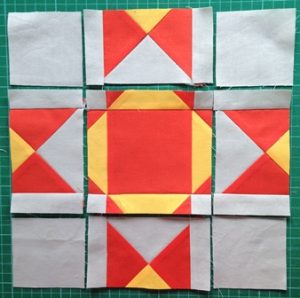
For this block, the only units that are moved are the middle side and top and bottom pieces.
Rotate the pieces 180 degrees as pictured.
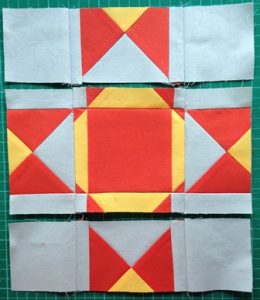
Carefully piece the units together into rows, taking care to match where the other seam lines meet.
Press so the seams alternate directions between the rows.
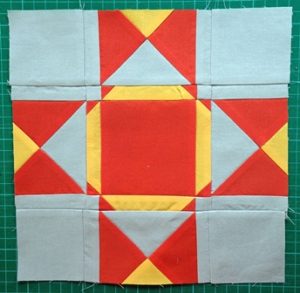
Finally join the rows together to reveal your new re-pieced 9-patch Ohio Star Block.
As before, this finished block will be smaller than your original block (approx. an inch), but we will take care of that when we assemble the quilt top at the end of this project.
Enjoy these new blocks this month for your Exploring Blocks Sampler Quilt, and keep an eye out for Block 5 at the end of November!
Have a great week!


This is so awesome! I can’t wait to try it.
My kind of quilt block. Great!!!