
Simple Travel Bags with Improv Blocks
August 28, 2024

Hi!
I hope you enjoyed last week’s post with the review of Cindy Grisdela’s Improv Blocks course, and if you missed it, do take a minute to read through it, as today’s patterns build on the Improv blocks that I made last week.
There is something totally freeing about making improv blocks – there’s no hard and fast rules, and you can’t really make mistakes, and they’re a fabulous way to spend some time being creative, and letting your imagination run wild. Will you love every block you make? No – probably not, but will you learn something along the way? And to that, the answer is yes. Start today and practice some skills, and really – in the privacy of your own sewing room, who’s going to know if your Improv blocks are good, bad or ugly??!! 🙂
So with that in mind, I made a bunch of different blocks last week while I was playing around, and I promised a pattern for you this week, so here goes…!
Simple Travel Bags (with Improv Orphan Blocks)
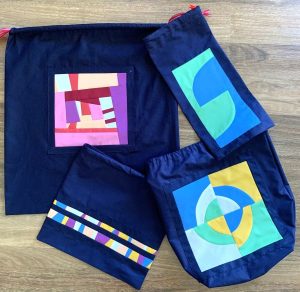
I’m heading off for 10 days for a wedding soon, and I have been thinking about making some kind of bag for packing my shoes in, which led to a bunch of different sized bag ideas. I know shoe bags might seem a little silly, but it’s one of those practical things that once you have them, you can’t remember how you managed without.
I always used to just put my shoes in plastic bags and then in the bottom of the suitcase, but with plastic bags on the decline, it was time to think of something prettier (and washable), and now I’ve made these, I can’t wait to use them!
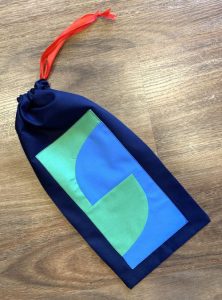
Let’s start with the Small Shoe Bag:
Just a note – These sizes are guides only – make yours to whatever size you like, and I’m calling them what I’m using them for – you’ll find you can use them for a bunch of different things…. (Christmas gifts anyone??? 🙂 )
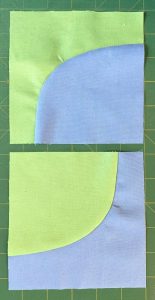
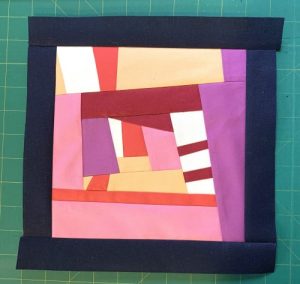
For this first bag, I used the two Improv curved blocks from last week.

I sewed them together and then pressed under a 1/4 inch seam allowance around all edges. (I decided to sew each of these Improv blocks onto a solid background rather than piece them into the fronts of these bags, to stop all the threads from the back of the blocks coming lose in amongst my shoes etc in the bags. They’re going to need to be able to withstand a bit of wear and tear.)
From left over navy fabric, I cut two pieces measuring 8 x 17 inches long.
Position the blocks towards the bottom end of the front panel and pin in place.
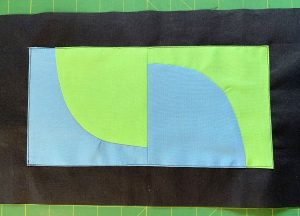
I simply topstitched around the edge to secure the blocks in place.

Next, at the top of each panel, fold under a 1/4 inch seam and press, then fold over about 1 – 1 1/2 inches and press again. This is to make a channel for your drawstring at the top.

Lay your two pieces with right sides together and pin and sew down both sides and across the bottom. (Open out the folded tops and sew together first.)
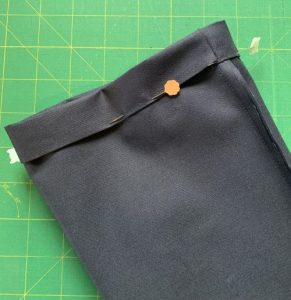
Now fold the top back down and pin. Topstitch along the bottom edge to make the drawstring channel, and make sure to leave a 1-2 inch gap unsewn at one side, for your strings.
Use a bodkin or safety pin to thread through a length of ribbon to suit, and knot the two ends together.
Turn right sides out, and press, and this little bag is ready to fit in some summer sandals!
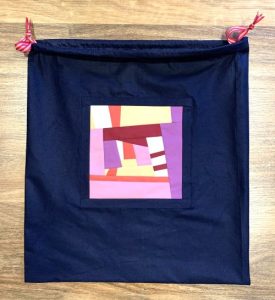
Large Shoe Bag

Now, I will be taking my sneakers / joggers with me too, and I needed a roomier bag to fit them in, so this version has a boxed bottom to fit bulkier shoes.
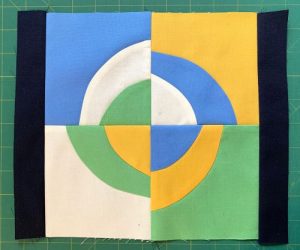
I used the 4 double pieced curved blocks I made last week, and pieced them into this arrangement. Then I added a navy blue border to all four sides. I cut it about 1 1/2 inches wide, again, so I could tuck under a seam allowance and topstitch the framed block onto the front panel of this bag.
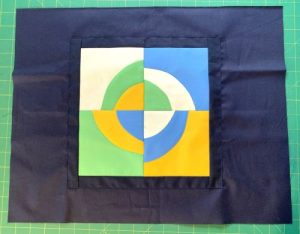
For this bag, I cut two pieces measuring 15 x 19 inches, and appliqued the pieced panel onto the front.
As before, layer the two bag pieces with right sides together, and sew down both sides and across the bottom.

To make the boxed base, measure and cut out a 2 3/4 inch square from each of the bottom corners.
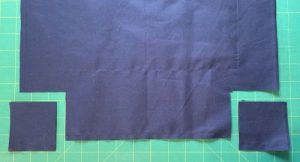
…Like so.

Open out the corners and align the side and bottom seams, and pin across each corner.
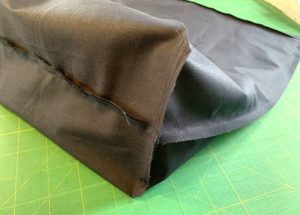
Sew across the corners to box the base.
Fold down and press the top, to make a drawstring channel. Pin, and topstitch around the edge as you did last time, to make the channel, taking care to leave at gap at one side for your strings.
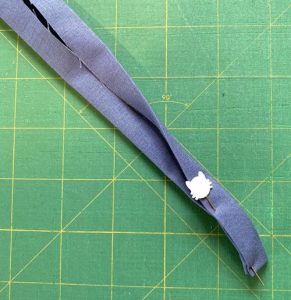
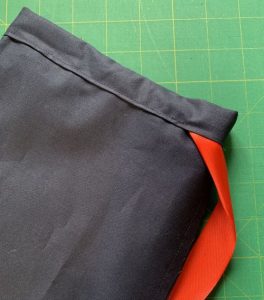
Rather than ribbon for this bag, I used a length of left over binding. Open it out, and fold in each side to the centre crease. Press, then refold and pin. Tuck in the ends too, then topstitch to secure.
Thread through your drawstring channel, knot the ends and bag number 2 is ready to go!
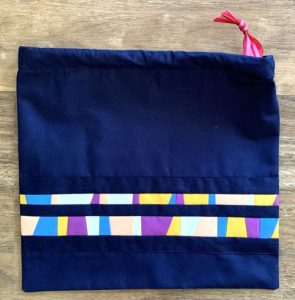
Washing Bag
By this point I was well and truly into making bags to show off my Improv Blocks, so this next one is bigger again. I’m going to use this as my dirty clothes bag, to keep worn clothes separate to my clean ones, and so when I get home I can just empty this out and start washing.
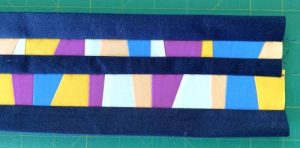
As before, I put a navy border on my Improv Log Cabin Block, as it’s easier to tuck under a seam allowance on a simple border.
I cut one piece measuring 20 inches wide x the width of fabric for this bag, and I kept the selvedges on for the top edges.
Press under the seam allowance on the bordered improv block, and pin it to the middle of the front panel. Topstitch to applique in place.
Fold in half with right sides together and the fold at the bottom, and sew down both sides.
Fold down the top to make your drawstring channel as before, (this time I just folded it once, using the selvedge as the inner edge), and this time, leave a gap at EACH side, for the strings.
I found some matching ribbon and made two drawstrings – one ending at each side. Thread through in opposite directions, then knot the ends to finish.
Underwear Bag
I know… it seems like I’ve lost it well and truly, but I had one set of Improv Blocks left….
For this last bag, I decided to make a simple mid-sized bag for underwear. Unless you’re super organised, we’ve all ratted through the bottom of our suitcases looking for knickers at some time, and if they’re all in a pretty bag, now I’ll know exactly where to find them. 🙂

You might remember these angled strips from last week…
I sewed them all together end to end, then cut them (at a bit less than half) down the length. I added a navy strip in the middle (cut 1 inch), and border strips along either side. I didn’t worry about the short ends, as this time they finished in my side seams.
From the navy fabric, I cut two pieces measuring 14 x 12 inches, and sewed the improv block strip across the bottom of the front panel.
Layer the two panels and sew with right sides together to make your bag. Fold under and then sew the drawstring channel. Turn right sides out and press, then I added a ribbon drawstring as I’d done for the other bags.
Ta dah! A couple of hours’ work, and now I’m all set for packing my suitcase this week!
I hope you can use these ideas to whip up some multi-use bags for yourself (or make a set for Christmas gifts), and I think they’re a really great way to use up and show off some orphan blocks (or your practice Improv Blocks!).
Let me know what you think in the comments below, and what you’re making them to use for.
Enjoy your week!

One response to “Simple Travel Bags with Improv Blocks”
Leave a Reply

Welcome to our
Online Quilt Magazine Blog
Read through to discover hints and tips, articles from magazine contributors, sneak peeks and more!
Please enter your email address in the box below to receive notification of
new posts by email.

Thanks for the pattern…will make a nice gift…