
Bayside BOM – Part 3
August 14, 2024

Hi!
This week it’s time for the next instalment of our bright and happy Bayside Block of the Month quilt.
So, without further ado – here’s our Part 3…
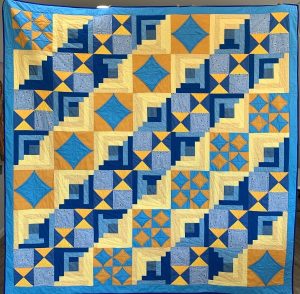
“Bayside” BOM – Month 3
To recap –
Bring a splash of beachy sunshine into your home with our classic blue and yellow “Bayside” samper quilt! This queen bed sized quilt is a great stash buster too – make it scrappy, or coordinate your colours and your blocks, or do a bit of both, as we did.
This quilt features some simple big stitch embroidery on a few of the blocks, and a coordinated quilting plan makes this one you can quilt yourself if you want to as well.
Scroll back through our previous posts to find out more info about fabric requirements etc.
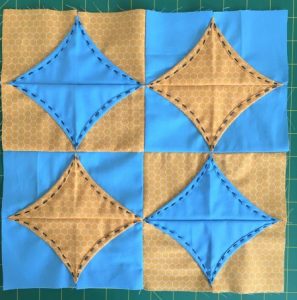
This month, you will make six of these 4-patch cathedral window style blocks.
You Will Need:
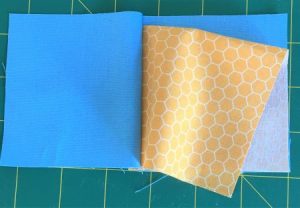
One blue fabric and one yellow fabric of your choice. (Use the same fabrics as you did last month for the large Cathedral Window blocks.)
We used –
1½ yards / metres plain mid blue fabric (Note – we bought an extra yard / metre to use for the quilt border as well.)
1 ½ yards / metres fine print mustardy yellow fabric.
Navy blue perle cotton or embroidery thread for the quilted line decoration.
Cut:
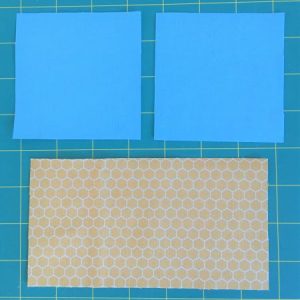
From the blue fabric, cut a total of 24 rectangles, measuring 6½ x 3½ inches.
From the blue fabric, cut a total of 48 squares, measuring 3½ x 3½ inches.
From the yellow fabric, cut a total of 24 rectangles, measuring 6½ x 3½ inches.
From the yellow fabric, cut a total of 48 squares, measuring 3½ x 3½ inches.
Piecing:
As you did last month, these cathedral window style blocks are made up of a pair of flying geese units.
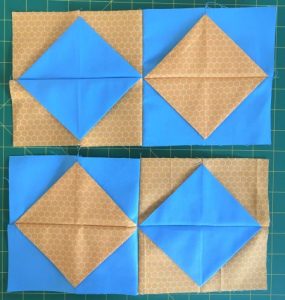
To make the larger four-patch block, you will need 4 completed ‘windows’ – two with a yellow background, and two with blue.
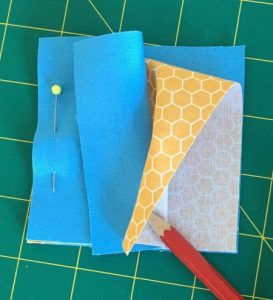
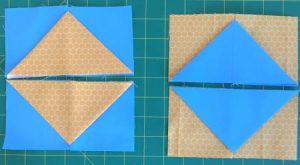
As you did before, fold the rectangle in half with wrong sides together and place between two background squares, so that the fold is at the top, as shown.
Pin, and sew along the left hand edge.

Open out and fold the centre rectangle down to make your triangle.
Press well.
Your sets of pairs, making the opposite blocks.

Lay out your units as pictured. In pairs, and with alternating colours between the blocks.

Sew to join the flying geese pairs and press well.
Join your blocks in pairs and press seams in opposite directions.
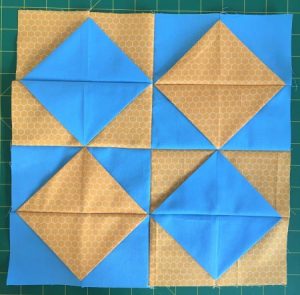
Finally join the pairs together and press well.

Pin back the centre part of these curves the same amount before topstitching with your navy thread, so they are all matching.
We folded back ¼ inch on each curve.
Your finished block.
Make six of these.
When you have finished all six blocks, press well and put aside for next month when you will assemble and finish your “Bayside” quilt.
Next Month, you will make a bunch of Log Cabin blocks, and assemble and finish your quilt!
Enjoy your week, and as always, please let us know what you think of this project.

5 responses to “Bayside BOM – Part 3”
Leave a Reply

Welcome to our
Online Quilt Magazine Blog
Read through to discover hints and tips, articles from magazine contributors, sneak peeks and more!
Please enter your email address in the box below to receive notification of
new posts by email.

I love this method of making Cathedral Window blocks. It’s easier and quicker than the traditional way.
Hi Jody
I have just finished month 2. I found the cathedral windows a bit of a challenge because of the many layers you had to sew through. Are there any tricks to make it easier?
Also, hand quilting is not my forte, do you think machine stitching the curves would work?
Hi Beate!
Thanks for your comment. If you’re having trouble sewing through the layers, take it slow, and you might like to try a larger needle (even up to a jeans needle), as this will get through the fabric much easier. Ours were OK on our regular machine, but take it slow and you should be fine. You can absolutely machine sew the curves too – we just did ours by hand for a bit of contrast detail, but machine is quick and easy too.
Somehow I missed part 2 of the Bayside BOM instructions. Is it possible to get a copy. Thanks
Hi Kay! You can find the Part 2 of this pattern at – https://blog.onlinequiltmagazine.com/2024/07/10/bayside-bom-part-2/
Hope that helps, and I’m looking forward to seeing your quilt!! 🙂