
Bayside BOM – Part 4
September 11, 2024
Hi!
This week’s post is a big one as we’re at the point of finishing our big bright and happy “Bayside” Block of the Month Quilt!!
We have one more set of blocks to make first, then we can jump in to assembling and quilting to finish. So let’s get started…
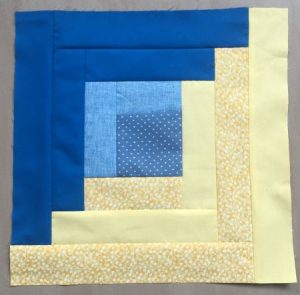
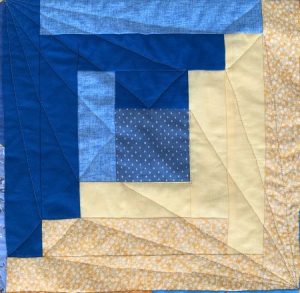
This month, you will make 24 log cabin blocks to finish your Bayside Quilt.
You Will Need:
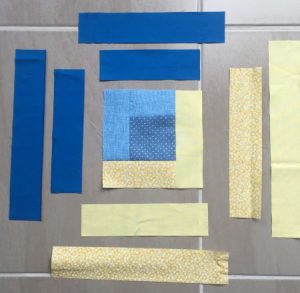
Three blue fabrics and two pale yellow fabrics
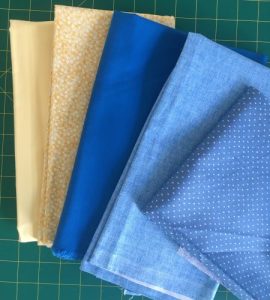
We used –
¼ metre / yard spotty blue fabric for the centre square. This is only used in the centre, and each square has the same blue fabric centre.
¾ yard / metre dark blue fabric
¾ metre / yard denim blue fabric
¾ metre / yard patterned yellow fabric
1 metre / 1¼ yards plain lemon yellow fabric
Cut:
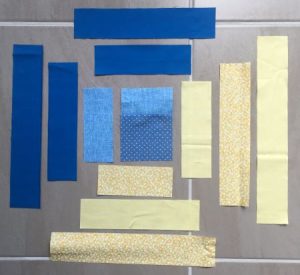
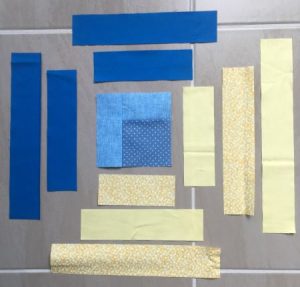
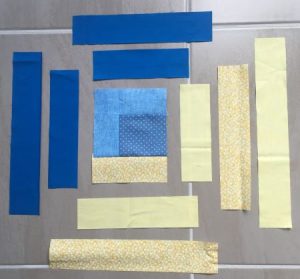
Each block is half blue and half yellow, and all with the same centre. Use your two blue and two yellow fabrics to make these blocks scrappy.
Refer to the Cutting Guide below for the strips you will need for each block.

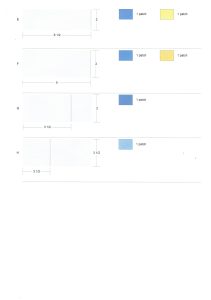
Piecing:

You will need to make a total of 24 of these Log Cabin blocks, and they are all the same colourway, with blue on one side, and yellow on the other.
Make them all the same, and mix up the fabrics within each colourway.
(Tip – you may find this quicker to chain piece these blocks. Cut all your strips first and make a production line to make them.)
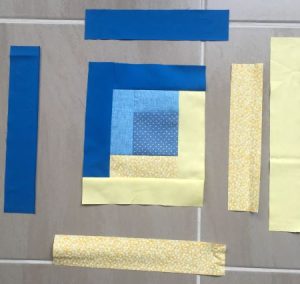
Join the blue G to the centre H square.
Press.
Add the blue F strip to the left hand side.
Sew yellow F across the bottom.
Press.
Add yellow E to the right hand side.
Keep working your way around in order.
First blue E at the top, then blue D to the left, and yellow D on the bottom.
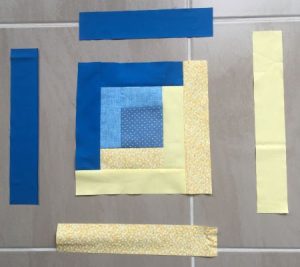
Sew yellow B to the right hand side.
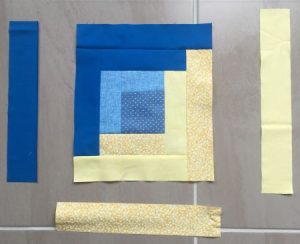
And the final round –
Blue B across the top.

Blue A on the left.
Yellow A across the bottom.
And yellow C on the right to finish.
Press well.
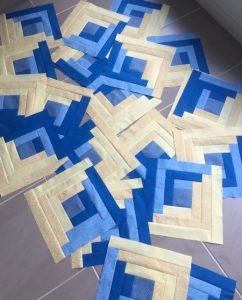
Make 24 blocks.
Assembly:
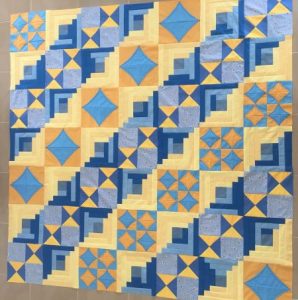
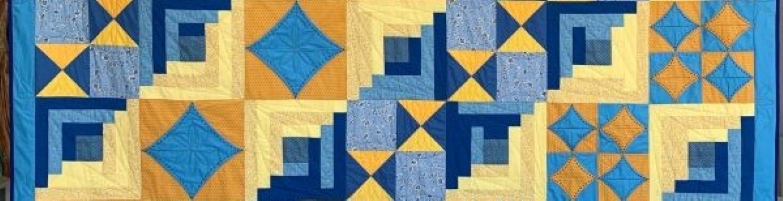
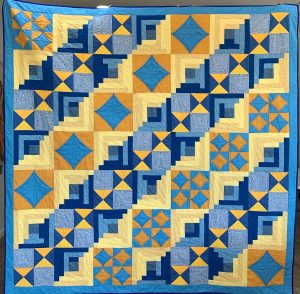
Refer to the following quilt diagram, and lay all of your blocks out in order.
The different blocks form diagonal lines across this quilt.
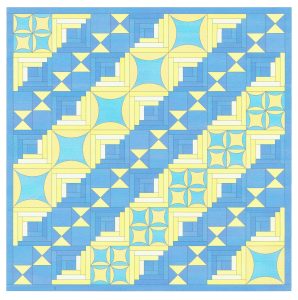
Note the direction of the hourglass blocks, and rotate the log cabin blocks to create the lines as pictured.
Note too– your faux cathedral window blocks are actually on point as in the photo above, rather than square on as in this diagram.
Border:
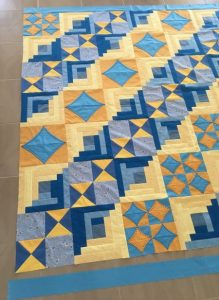
Use the same mid blue fabric you used in your cathedral window blocks for the border.
Measure the top and bottom of your quilt and cut and piece sufficient 3½ inch strips for these borders.
Sew to the quilt top and press well.

Measure again, and cut and join sufficient 3½ inch strips for the side borders.
Sew to the quilt top and press well to finish.
Quilting:
Place your backing fabric face down on a flat surface, then smooth the batting on top. Put your quilt top on top of that, centred and smoothed flat.
Pin the layers together in preparation for quilting.
The following is a guide for the quilting we did on our quilt. We quilted ours on a regular domestic machine, and we quilted the blocks in their diagonal rows, to make it easier. The following images are details of our quilting on each of the different blocks, and the border.
You of course, can quilt yours however you like.
The hourglass blocks have a three petal repeated ‘flower’ in each of the yellow triangles, and also curves around the edges of the blue squares to echo the look of the cathedral window blocks.
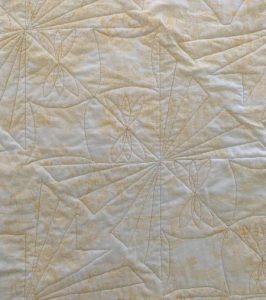
The reverse side.
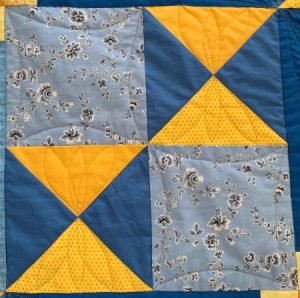
The log cabin quilting is shown between the diagonal hourglass blocks.
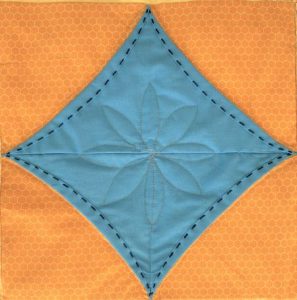
The large cathedral window block.
We travel stitched to the centre and stitched an 8 petal flower motif. Travel back to the side and echo stitch around the curves of the window before continuing on to the next block.

The reverse side of the large cathedral window block.

The small cathedral window blocks have an 8 petal flower in the very centre.
Travel stitch vertically following the seam lines to get in to and out of the centre.
The back, showing the quilted centre flower.
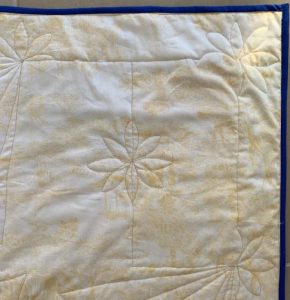
The borders had the flower motif echoed at the corners and at the join of each block.
Travel stitch along the seam line to get to each point.
The log cabin blocks each had simple point to point straight line quilting to create a kind of framing fan shape around the other pieced blocks in their rows.
We quilted each half of this block separately and used the quilting to travel from block to block diagonally, working in the other defined block rows in the quilt.
We recommend that you take a photo of your finished quilt top and print it as large as you can on a piece of paper. Print in pale colour or black and white.
As we did, you can then use a pencil or fine pen to draw out your quilting designs. Play around with what looks good, or works better, and plan your moves both within each block, and getting from block to block without having to stop and start again.
Below is our design plan – there’s a couple of variations, trying different ideas out, but it will give you a good idea of the overall quilting plan.

Finishing:
Trim the batting and backing to match your quilt top.
Cut sufficient 2¼ inch binding strips from the plain dark blue fabric you used in your hourglass blocks and join together with 45 degree seams. Press the ¼ inch seams open, then fold the strip in half, right sides out and press.
Join the binding to the right side of the quilt edge with a quarter inch seam, mitring each corner as you go. Turn the folded edge of the binding to the back and slip stitch it in place with thread that matches the binding to finish.
And you’re done! We hope you’ve enjoyed this short BOM quilt-along, and as always, please comment below and let us know what you think, and share your photos – we’d love to see your finished quilts!!

2 responses to “Bayside BOM – Part 4”
Leave a Reply

Welcome to our
Online Quilt Magazine Blog
Read through to discover hints and tips, articles from magazine contributors, sneak peeks and more!
Please enter your email address in the box below to receive notification of
new posts by email.
Hi Jody
I like your quilting suggestions.
What colour thread did you use?
Hi Beate,
I don’t have the quilt with me right now to double check, but from memory I used a stone / beige coloured thread for this quilt as it seemed to blend best with the blues and yellows.