
We’ve got Christmas all Tied Up…!
November 14, 2020
Hi!
Wow! Thanks so much for your feedback and comments from our last post about how to make Half Square Triangle units, 2, 4 or 8 at a time. I hope you can get practicing these now.
As you know, we’ve been designing quilts and publishing patterns for more than 10 years through our Online Quilt Magazines, and it’s time to ramp it up now. Rather than having to wait for one set of patterns each month in the magazine, this Christmas we’re launching our Quilter’s Christmas Advent Calendar, where we’ll send out a new quilty treat each day through December in the countdown to Christmas. Opening your email will be exciting!
Each day through December, you can count down to Christmas with a surprise downloadable mystery pattern, sent straight to your Inbox.
There will be a great range of projects including quilts, bags, Christmassy projects, and others suitable for gifts, and these projects are suitable for all skill levels to make. Each project has easy to understand instructions and lots of photos, and full-size templates are included if needed. Many of these patterns will be suitable for year-round use too, so you can build yourself a handy go-to pattern library for when you need gift ideas to make.
Today, we want to share another fun technique with you, that can honestly have you creating some great gifts in next to no time.
We’re talking fabric wrapped rope today. (That nice soft cotton clothesline cord).
This is a really fun technique to try, and is a great way for using up scraps and creating one-of-a-kind gifts quickly and easily. Really, once you know how to do it, the sky’s the limit – make bags, baskets, placemats or tablemats that are not only durable and hardwearing, but look great too!
The following pattern is how to make our Rope Wrapt Tote Bag, but the principles are the same for whatever you decide to make.
Rope Wrapt Tote
This quick and easy tote is fun to put together! For those who wanted to know how to make a clothesline rope bag, we have some directions for you this week. For this style of bag, measurements are entirely up to you, so we will give you some guidance as to what we did, but the rest is yours to play around with!
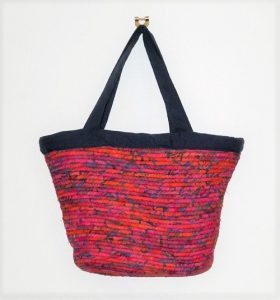
Our Bag Dimensions are 14 inches wide at the top x 9 ½ inches high x 3 inches deep.
You Will Need:
¾ – 1 metre / yard of cotton fabric of your choice (we used a bright batik)
100 ft ( 35 metres) minimum length of braided/woven cotton clothesline cord with an approximately ¼ inch diameter, for a bag this size. (You will find the cord at some craft shops, otherwise try your local hardware store.)
Small amount of fabric in a colour to match for the bag handles, and bag top (if you wish to add one)
To Construct:
Cut your bag fabric into 1 inch strips. When you are ready to use them, cut them into shorter lengths too, for ease of handling. Cut once in half (on the crease line from the bolt) will be fine.
The fabric strips are simply wrapped around the rope diagonally with some overlap, then the covered rope is coiled and sewn together to construct your bag.
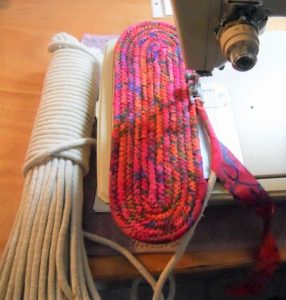
To start, fold the rope back on itself for the centre of the bag base, (we did a 7 inch length) and stitch together.
Use a wide zig zag stitch and make sure that it catches both pieces of rope to secure them together. Keep the rope in one long length and cover each next section as you need it, overlapping the fabric ends.
Coil the next bit of covered rope around the sewn section and keep sewing it together with the zig zag stitch until the base has reached the size and shape you want.
It is a good idea also to run a couple of diagonal rows of straight stitching across the bag base to stabilise it further too.
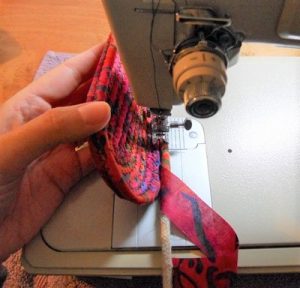
When the base is as you want, hold the base up as shown, as you attach the next coils to start the upward shape of the bag.
The higher up you hold the base when you do this, the steeper the sides of the bag. For a more relaxed bag shape, don’t hold the base up quite so high.
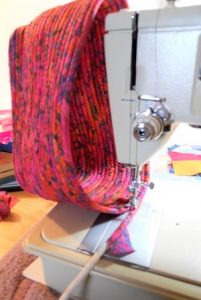
Continue sewing coils around the bag (as shown) until you reach the size you want.
To finish, simply cut the cord and cover the end with some fabric, tuck it next to the bag and stitch it together.
To finish our bag (and hide a slightly uneven top) we made a simple fabric band in a contrasting colour, and some matching fabric handles.
To do as we did, cut four strips of fabric the length of your bag plus 1 inch x 1 ½ inches wide. Interface if required. Cut two strips of fabric 2 ½ inches wide x the length you want your handles. Interface also if required.
Press the handle strips in half with wrong sides together, tuck in the seam allowances and topstitch down both sides. Position a handle between two of the bag top strips (right sides together) with raw edges together and sew the top seam to secure the handle. Turn out and press, and repeat for the second handle.
With right sides together (and adjusting the seam allowances if necessary for a smooth fit), sew both pieced top strips together at the side seams. Press under the seam allowances and slip the circle over the top of the rope bag. Pin in place and topstitch to secure both sides and finish.
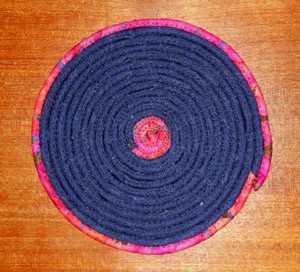
Should you have any rope left over, it’s easy to create “hot pot mats” too.
Get creative with this technique and make your own round or oval placemats as well!!
How great would these look in Christmassy fabrics as table mats or baskets? Make shallow baskets for gift hampers – pop in a few personal items (maybe hand cream or bath bombs), and that’s a unique gift for someone special. You’ll be remembered for great gifts this Christmas!
We’ll be launching our Quilter’s Christmas Advent Calendar next week, but until then, keep an eye out for our next email, where we’ll practice binding, with the invisible join technique, and perfect mitred corners.
We hope you enjoyed hearing about this fun technique, (and remember to send through finished project photos for our Online Quilt Magazine “Show and Tell” ), and as always, we’d love to hear any feedback from you. Please comment below.
Chat again soon,
Regards,

10 responses to “We’ve got Christmas all Tied Up…!”
Leave a Reply

Welcome to our
Online Quilt Magazine Blog
Read through to discover hints and tips, articles from magazine contributors, sneak peeks and more!
Please enter your email address in the box below to receive notification of
new posts by email.
Thank you for this projects and the ones to
follow. I’ll look forward to December.
Stay safe.
Looks like fun
I’d like to try this. Do you use a special foot or a certain size needle to sew this?
Hi Lori!
If you sew carefully and not too fast, you should manage with a regular needle and any foot that allows you to zig zag. If you have a jeans needle, that will help too, but it’s not essential.
What a great project!! I’ll be trying it for sure!!
Great ideas thank you
Thank you for these great ideas!
Really interesting! The Christmas Advent idea is wonderful and very much appreciated. Thanks for always coming up with something different and lovely.
Great idea
Looks interesting and fun.