
Quilt As You Go – How to Connect Quilted Pieces
August 9, 2022
Hi!
I’m sorry it’s been a while again since I last blogged, but you will have seen in the magazines that we’ve been super busy recently with new projects, and our new Quilter’s Advent Calendar for this year. This year we have a Brand New website for our Quilter’s Advent Calendar, and we’re being busy little elves designing and making a bunch of new projects to share with you at the end of the year.
Today I thought I’d share an article from last November’s Premium Online Quilt Magazine, where Leah shared her process for Quilt As You Go (QAYG), and how to connect those quilted pieces.
This is actually a really fun technique to use, and it certainly makes handling the quilting of a whole quilt much easier too.
Leah writes:
” I don’t know about you, but my sewing room is filling up with small practice quilts and I think it’s time we learned how to put these quilted pieces together to create bigger quilts.
This method is traditionally known as Quilt As You Go because you can literally quilt each piece as you create your quilt, then put the quilted pieces together at the end.
I love this method because it’s SO much easier to quilt smaller pieces on a domestic sewing machine.
While not every quilt pattern can accommodate a Quilt As You Go construction method, many can, and it’s definitely worth considering, especially if you have a king sized quilt in your future.
Let’s review how to connect quilted pieces together:
#1 – Trim and Square – Trim your quilted pieces so they’re roughly the same size and square.
Let’s call these pieces Piece A and Piece B.
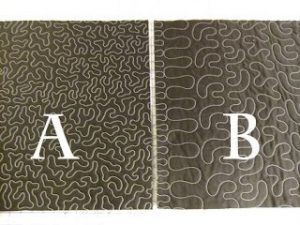
Make sure to trim off any places where the fabric shifted to show the batting underneath. You need a solid piece with fabric+batting+fabric through the whole sandwich. Also make sure to trim INTO the quilting so you’re not leaving weird lines you stitched to get to another row, etc.
#2 – Cut Binding – You will need 2 strips of binding for every seam you connect:
Top Binding: 1 inch wide
Back Binding 1 1/2 inches wide – fold this binding in half and press the snot out of it.
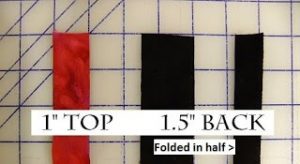
Make sure both binding strips are a bit longer than the pieces you’re connecting together. It’s always easier to trim the excess away, but not add more if it runs out half way through the seam!
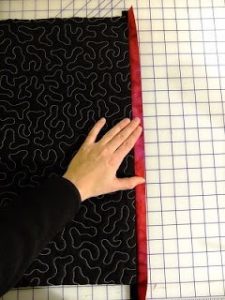
#3 – Layer first seam – Lay the top binding on your table with the raw edges facing the RIGHT. Lay Piece A with the raw edges matching up with the raw edges of the top binding. Lay the TOP binding strip on top of this stack. Hold them together or pin as needed to get to your machine.
#4 – Stitch seam #1 – Stitch through all 3 layers: top binding, Piece A, back binding carefully with a SUPER accurate 1/4″ seam allowance.
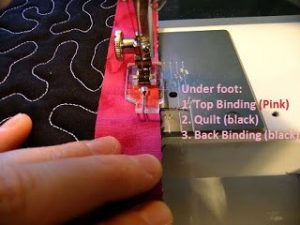
With all these layers it’s sometimes easier to stitch this with a walking foot, but I prefer to use a piecing foot because it’s much more accurate. Of course if you have a 1/4″ walking foot, you’ve got the perfect foot for the job!
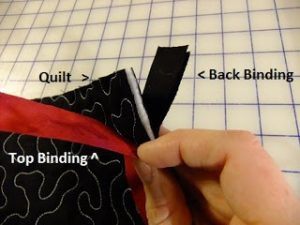
#5 – Finger press and prep for second seam – Lay Piece A on your table and finger press the TOP binding over to the RIGHT. If you need to hit this with your iron you can, but finger pressing firmly usually works fine.
Now layer Piece B right side UP, and put Piece A on top, right side down. Line up the TOP binding with the edge of Piece B.
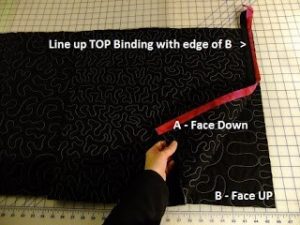
Make sure the back binding stays firmly attached to the back of the quilt. and out of your way You do NOT want to stitch through it in the second seam.
#6 – Second seam – Match up the TOP binding strip with the edge of Piece B. This leaves a nice little groove for your foot to fit into as you stitch the seam.
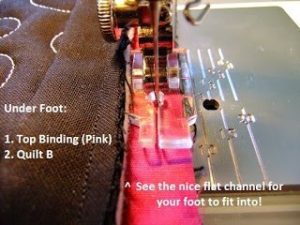
By stitching this way, the back binding is on top so there’s no chance of accidentally stitching through it!
#7 – Finish folded back binding – With the second seam stitched, take the connected quilted pieces and unfold them. Press both seam allowances into the groove created by the TOP binding.
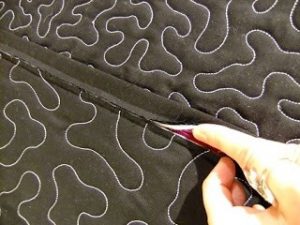
Here you can see both seam allowances fitting snugly together in that 1/2 inch groove created by the top binding.
Flip the quilt over to the back and finger press the BACK binding over to the right.
You want this top binding to stretch over both seam allowances and be secured along the second line of stitching.
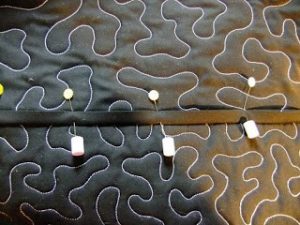
Pinmoors are wonderful for capping the ends of these pins so you don’t get stuck while closing the seam!
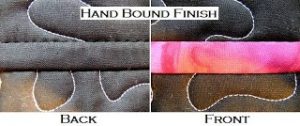
Here’s what it looks like when you secure the back binding by hand:
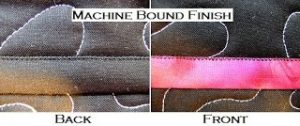
Here’s what it looks like when you secure the back binding by machine:
It’s entirely up to you which way you secure the back binding! Securing by hand will give you a perfect, seamless, stitchless finish on both sides.
Securing by machine will be much faster and of course, you can use less visible thread that won’t show up as much on either side.
Once you connect and finish the seam for 2 pieces, the next step is to connect 2 more pieces, then connect all 4 together to create a pretty quilt! All the seams can be connected using this same method, just make sure to cut longer and longer binding strips.
Now keep in mind that this is not the only Quilt As You Go technique or the only way to connect quilted pieces together!
There are many more methods and even whole books written on these Quilt As You Go techniques. I simply prefer this one because it creates a nice flat finish and it allows you to connect fully quilted pieces together. You don’t have to worry about leaving space along the edges or anything crazy like that, and it also binds up all your thread ends so there’s no mess!
Let’s go quilt,
Leah Day”
About the Author: Leah Day is the author of the Free Motion Quilting Project, a blog project dedicated to creating new free motion quilting designs each week and sharing them all for FREE! Leah is also the author of From Daisy to Paisley – 50 Beginner Free Motion Quilting Designs, a spiral bound book featuring 50 designs from the project, and she now has three Free Motion Quilting classes available through Craftsy.com . www.daystyledesigns.com
Check out Leah’s websites and classes – she’s a fantastic teacher, with some great hints and tips along the way!
Check out our Advent Calendar site too – www.QuiltersAdventCalendar.com and get your Christmas Groove going!!!
Enjoy,
![]()
2 responses to “Quilt As You Go – How to Connect Quilted Pieces”
Leave a Reply

Welcome to our
Online Quilt Magazine Blog
Read through to discover hints and tips, articles from magazine contributors, sneak peeks and more!
Please enter your email address in the box below to receive notification of
new posts by email.
Will try to follow your ideas.
Thanks
thanks.. one can obviously vary the strip widths and fill the gaps with wadding strips.. folding the back is time saving!!