
Get Ready for Christmas – Felt Bauble Ornaments
November 14, 2022
Hi!
It’s that time, when it’s time to start getting ready for Christmas again, and this year, we’re here to help!!
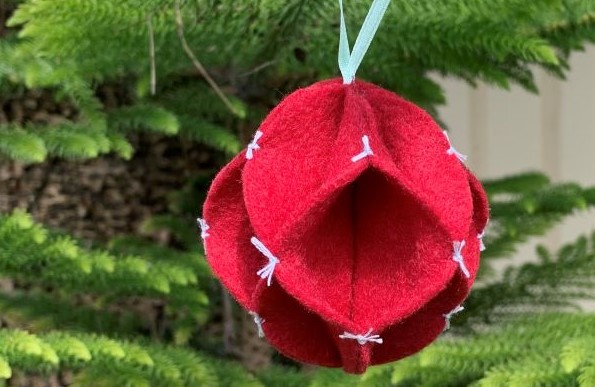
Remember those fancy folded paper ornaments that you open out and they become a 3D bauble? This is our version of one of those, and it’s really fun to make! Dig out some felt and get busy making our Felt Bauble Ornament.
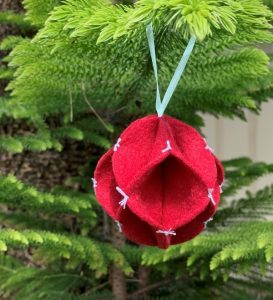
Our bauble had a diameter of approx. 3 inches.
You Will Need:
1 sheet of coloured felt (standard piece of paper size)
Small amount of thin ribbon
Small amount of embroidery thread
Assembly:
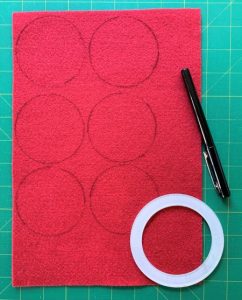
You will need 6 circles for this bauble.
We used a 3 inch circle, but use whatever you have to hand to trace around – a cup or jar lid will be fine. (Don’t go too much smaller for your first as it might be a bit fiddly.) A regular felt tip pen works well to trace the circle with.
Trace 6 circles onto your felt.
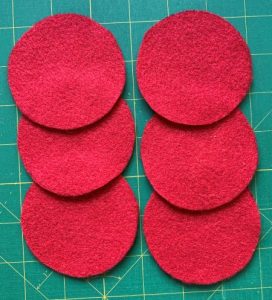
Cut them out carefully with scissors.
Now stack them up neatly on top of each other, in two stacks of three.
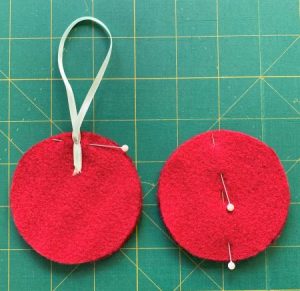
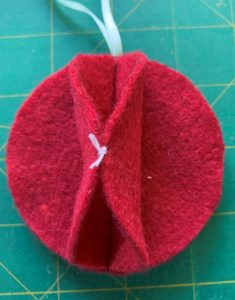
Cut a length of ribbon about 8-10 inches long and fold in half as pictured. Pin it to the top centre of the circle in one stack, so that it is right at the top of the circle, with the ends extending in about an inch.
Fold the top circle of your other stack in half and mark the centre line with pins.

Now place the pinned stack on top of the stack with the ribbon, and make sure it’s all stacked neatly.
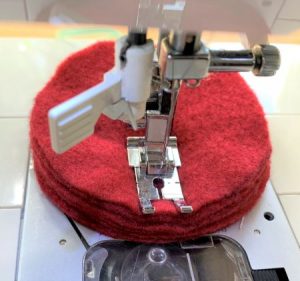
You can hand stitch this if you’d like, otherwise the machine will do it fine.
Carefully stitch down the marked centre line through all six circles.
Start at the top, and make sure your ribbon is caught in this stitching.
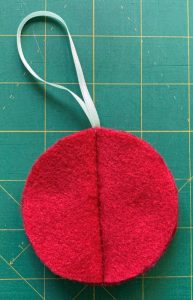
Your stitched set of circles, with the ribbon loop secured as well.
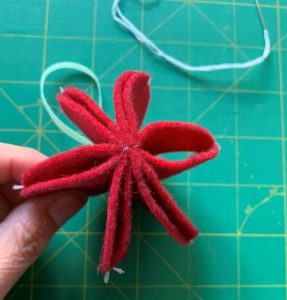
Now for the fun part!
We used three strands of embroidery thread to sew our sides together.
Another option to join the pieces is a hot glue gun too.
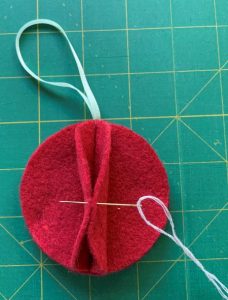
Bring up the top two pieces of your circles as shown. You will join them together in the centre of the curve.

Pull the thread through and leave a tail about 2 inches long.
We sewed over the top of the two pieces twice to secure them, then tied a simple double knot with the ends.
Snip the ends about a ¼ inch from the knot.
Your finished middle knot will look like this.
Work your way around, joining the circle halves in pairs with a knot in the centre of the curve as shown.
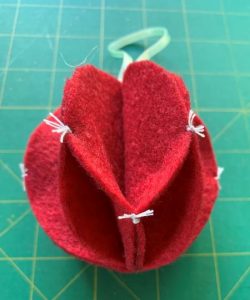
Next, bring together the two pieces that are adjacent to the knotted pair as pictured.
You will add more knots here to make the honeycomb effect of this bauble.
As before, sew and knot the two pieces, halfway along that (quarter) curve of your circle.
Work your way around and join all the lower parts in pairs.
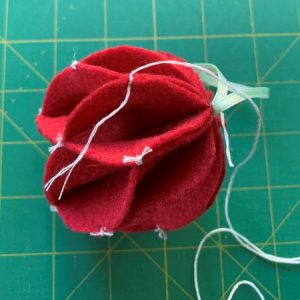
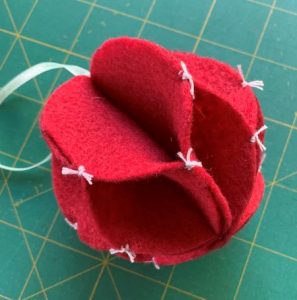
Now do the same for around the top of the bauble.
Bring together adjacent pieces of felt and knot halfway along the curve.
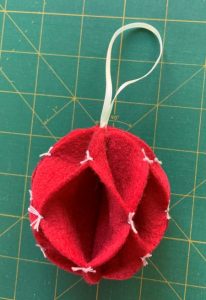
Your finished bauble.
Easy and fun, and oh-so-effective!
Make these in colours to suit your Christmas theme this year, or make smaller ones to add to presents as fancy gift tags – it’s up to you!
Let us know what you think of these in the comments below, and we’d love to see photos of the felt baubles you make!
Enjoy!

27 responses to “Get Ready for Christmas – Felt Bauble Ornaments”
Leave a Reply

Welcome to our
Online Quilt Magazine Blog
Read through to discover hints and tips, articles from magazine contributors, sneak peeks and more!
Please enter your email address in the box below to receive notification of
new posts by email.
So cute and easy for everyone! Thanks. we are adding bells!
Great idea!! Love it!
Greetings from Great Great Grandma in Ca.,
Thank you for the pattern, had mine but have a feeling it went with other patterns too a family friend. Started today using your pattern. We have three little GG Granddaughters so this will be a starter for this Christmas and ones in the future. I love sewing so this was a gift to me. From our home to yours a good old fashion Happy Thanksgiving & Merry Christmas.
Grandma RJR
Awwwww, thanks Rita! So happy you can use this pattern, and it will be a great one to do with / for your GG Granddaughters.
Made this at our CWA craft afternoon. Added a bell. Used more circles of contrast, green & white
That sounds pretty too.
Will give it a go. Looks like fun to make
Easy too!
Thank you for this lovely pattern – it is doable and so cute. They are going to be lovely done in all different colours and I might add some sequins for a bit of sparkly interest.
Perfect! Beads and sequins will be really pretty.
I love this. I work with Special Needs adults and this may
Be something they would enjoy doing.
If we can’t use needle and thread, fabric glue
and beads or sequense will work too.
Fantastic! I hope you can all have some fun with this. 🙂
Adorable.
Thanks!
This reminds me of other sweet, old-fashioned ornaments from my childhood. Thanks for clear instructions. These will be so fun to make with grandchildren!
Perfect! And if the sewing gets too much – a hot glue gun works well too!!
Being visually impaired this looks like a project that I can try with success!
Thank you!
I’m happy to hear that! Enjoy!!
very nice to keep busy in the long dark days of autumn. will try, you’ll see one of those days !
please do send me a photo!
Thank you for this tutorial.
Lovely idea, couldn’t wait to try it and so pleased with the result.
That’s great! Do send me a photo if you have one.
Love it. Looks perfect to make with grandkids.
It’d be a perfect project to all do together!
Wonderful! I have seen a bell shape too..
We did one of those in last year’s Christmas magazine as well, but there’s some great shapes you can use with this technique.