
Knot Your Average Quilt: Modern Tying Techniques for Today’s Quilters
August 9, 2023
Hi!
This week we’re taking a look at tying quilts, and a bunch of modern tying techniques that you may want to try on a project of yours soon, as there are a lot of pros for trying this easy technique…
Hand tying quilts is often seen as a more old-fashioned way of finishing a quilt, however this time-tested technique still has a relevant place in quilting today, with some more modern tying techniques making it a fun and quick process for today’s quilters.
Why Tie a Quilt?
Traditionally, quilts were often tied to achieve a distinct and rustic look that complements certain quilt designs, adding cozy charm and functionality to a handmade piece. They are tied today either to add a cozy and nostalgic touch to the quilt, reminiscent of handmade heirlooms and vintage aesthetics, or for a modern handmade take on finishing a quilt.
Tying a quilt can be a quicker and more accessible alternative to intricate quilting stitches, making it an ideal choice for beginners or those seeking a simpler finishing option. It can be easily done by hand too, for those unwilling to try and shove a big quilt through a small domestic machine(!).
Materials Needed:
– Completed quilt top, batting, and backing.
– Embroidery floss, perle thread, yarn, or other tying materials.
– Quilting or embroidery needle.
How to Tie a Quilt:
-
Prepare the Quilt Sandwich:
– Layer the quilt top, batting, and backing, ensuring they are smooth and wrinkle-free.
– Baste the layers together using safety pins, temporary adhesive, or hand basting.
-
Choose Tying Points:
– Determine where you want to place your ties. Common options include at the intersections of blocks, along seam lines, or at regular intervals across the quilt.
If, however, you’re tying your quilt, it’s probably best to leave a distance of no more than five inches due to the fact that the ties aren’t as dense as quilting stitches. Check your batting packaging for recommendations on minimum space between quilting.
A good way to mark where you want your ties to go is to use a water-soluble pen.

-
Cut and Thread Tying Material:
– Cut lengths of embroidery floss or yarn, typically around 18-24 inches long.
– Thread the material through a quilting or embroidery needle. (You can thread two colours at once too, for a multi-coloured effect.)
-
Tie the Quilt:
– Starting from the quilt top, push the needle down through all layers at a tying point, leaving a tail on the quilt top side.
– Bring the needle back up a short distance away and pull the thread snug on the back. You can just go down and up once, or repeat to make more of a stitch, before tying the ends.
– Insert the needle through the loop and pull tight to create a simple knot. Knot again to make a double knot.
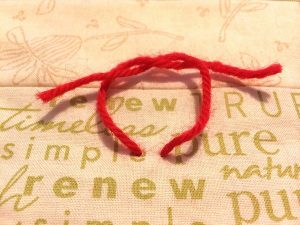
– Trim the ends of the thread to a desired length, leaving a small tail. (If you don’t like the ends showing, you can always bury them in the quilt too.)
-
Repeat and Space Ties:
– Continue tying knots at your chosen points, spacing them evenly across the quilt.
– Be mindful of the tension, making sure the ties are snug but not overly tight, to maintain a flat quilt surface.
Tip: You can do several of these simple ties at once too, to make it quicker. Thread your needle with a longer length of yarn, and make one stitch down and up, and move onto the next tie point without breaking thread. Continue going up and down on these tie points in a row until your thread runs out, then simply snip evenly between each tie point, and use the ends to tie your knots.
-
Finishing Touches:
– Give the quilt a final press to smooth out any wrinkles, then bind as usual.
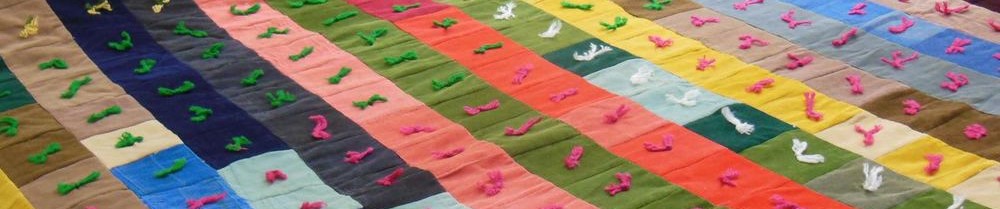
Modern Tying Techniques: Contemporary Twist on a Classic Technique
As quilting continues to evolve, so do the methods of tying quilts. Modern quilters are finding innovative ways to incorporate more modern tying techniques that add visual interest and creative flair to their projects. Here are some contemporary methods of tying a quilt that bring a fresh perspective to this traditional practice:
- Embroidery Floss Art: Instead of traditional yarn or thread, experiment with vibrant embroidery floss to create intricate designs as you tie knots. Combine colors and textures to produce unique patterns that complement your quilt’s theme. Maybe run a row of fancy embroidered stitches like herringbone over a seam, or a series of French or Colonial Knots.
- Geometric Tying Patterns: Plan out specific geometric patterns or arrangements for your ties, such as diagonals, chevrons, or concentric circles. Use these patterns to enhance the overall design of your quilt and create a modern, structured look. You could stitch stars…

You can use your machine too. For example, mark small squares or circles on the tie points on your quilt and use a wide machine zig zag stitch to go forward and backward over the mark to fill it in with a machine satin stitch. This looks great done in a geometric pattern on a modern quilt.
- Accent Ties: Choose a contrasting or metallic thread to create accent ties at key points on your quilt. These eye-catching ties can draw attention to specific elements of your design, adding a touch of glamour and sophistication.
- Tassel Ties: Instead of traditional knots, experiment with creating tassel-like ties. Leave longer tails when tying knots and then comb out the threads to create elegant tassel effects that drape beautifully across the quilt.
- Reverse Tying: For a subtle yet impactful look, tie knots on the quilt’s backing side, allowing the tied threads to show through to the quilt top as pops of color or texture. This works great with large cross stitches.

Image from Quilters Candy blog (https://quilterscandy.com/finish-a-quilt-by-hand/ )
- Mixed Materials: Combine different types of materials for your ties, such as thin ribbons, lace, or even strips of fabric from your quilt scraps. Mixing materials can add dimension and interest to your ties.
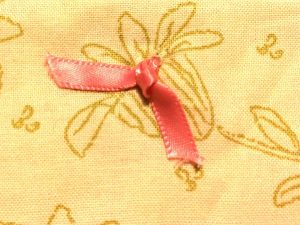
Tip: Love the ribbon look, but don’t want to thread it through the quilt? Use your machine and stitch securely over the ribbon on the tie point of your quilt (through all layers), then you can just tie the ribbon in a knot on top.
- Knot Placement Variations: Instead of tying knots only at traditional intersections, experiment with tying knots within specific blocks, creating a textured and dimensional effect within the quilt design. For example, you might tie a square area within a square using crosses, and another square elsewhere using French knots, or stars.
- Interactive Ties: Add a playful element to your quilt by incorporating ties that serve a dual purpose, such as attaching small fabric pockets, or using buttons for a more 3D visual effect.

9.Minimalist Tying: Embrace a minimalist approach by using a single tie color and spacing ties farther apart, allowing the negative space to become a design element in itself.
Tying a quilt is a delightful way to infuse character and warmth into your quilting projects. This approach offers both aesthetic appeal and practicality, making it a versatile option for quilts of various sizes and styles. Whether you’re aiming for a charming vintage look or seeking a simple and efficient finishing technique, tying a quilt is a rewarding skill that adds a unique touch to your quilting repertoire.
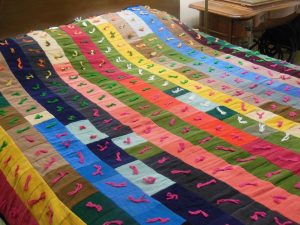
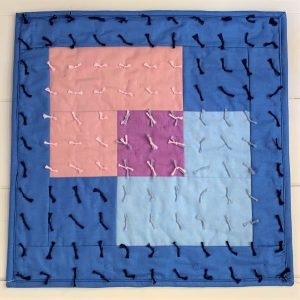
Image from:https://www.bluebirdgardens.com/handmade-quilts/tied-corduroy-twin-quilt
Remember too, modern methods of tying a quilt are all about embracing your creativity and pushing the boundaries of tradition. Experiment with various materials, patterns, and techniques to discover your own unique way of incorporating ties into your quilt designs. Whether you’re aiming for a bold, contemporary look or a subtle and sophisticated touch, modern tying techniques offer endless possibilities for adding a fresh and artistic twist to your quilting projects.
And there you have it!
Have a play, and do some experimenting to find out which method/s you prefer.
Quilting is fun, but sometimes a quick finish is more so!
Enjoy Your Week!

8 responses to “Knot Your Average Quilt: Modern Tying Techniques for Today’s Quilters”
Leave a Reply

Welcome to our
Online Quilt Magazine Blog
Read through to discover hints and tips, articles from magazine contributors, sneak peeks and more!
Please enter your email address in the box below to receive notification of
new posts by email.
Thank you. I can’t wait to try the techniques. It will be nice to give a quilt a clean look without having not to pay to have the quilt longarmed.
Tying does make for a quick and easy finish, and I think it’s a really pretty look on a modern quilt sometimes too.
Very good article. I’d like to know how tightly to the quilt do you tie the knot; keep it very loose, tie tightly enough to bring fabric together?
Hi Sandy – good question!
I’d tie it tightly, so that the layers are all held fairly firmly together. I wouldn’t recommend making the stitches /ties too big either, as you don’t want them to bunch the quilt fabric up when you tighten them.
love the ideas, so creative and adds a nice touch!
There are some cute ways of finishing quilts this way. I’m thinking a cross stitch might be one I’m going to have more of a play with…
Is tying good for baby quilts? I have made a flannel backed quilt with minky fabric on the front. It needs something to hold the middle area together and I am thinking of tying knots, but wonder if this is safe for a baby quilt as the thread might be pulled out by a baby.
Great question! If it’s just tied, the knot should be tight enough that a baby wouldn’t be able to pull it out, and tight enough too so that little fingers wouldn’t get stuck in the thread. For that reason, I would keep the ends fairly short too. You may want to think about some smaller cross stitch style ties maybe too – they could be decorative, as well as practical, and you can knot off each one firmly and trim the ends fairly short.