
Exploring Blocks Sampler Quilt – Month 2
August 30, 2023
Hi!
I’m thrilled that so many of you are joining in our Block of the Month Sampler Quilt, and I hope you enjoy this process of manipulating quilt blocks. It’s really fun, and I find it quite liberating to be able to just slice up a perfectly good quilt block and play around with the pieces to create something new. No Quilt Police Here!!
As I said last month, think of this as a mini course quilt-a-long, and together we’ll work our way through a set of 9 classic quilt blocks, and create a bunch more!
Just like a regular Block of the Month program, my plan is to work through a block a month with you on this blog, and the final month will be all about how to put them together into this stunning quilt. I’ve had some queries, and I will release each new set of blocks in the last post of the month, so make sure to keep an eye out for them then.
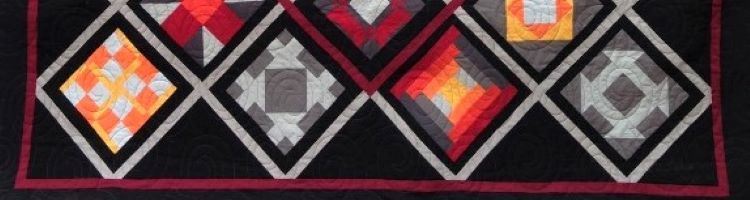
Here’s our quilt again:
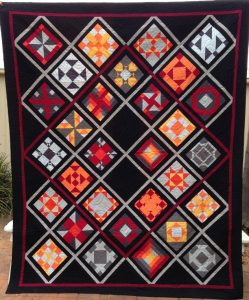
A quick recap –
For This Project You Will Need:

As the blocks will all be incorporated into a quilt at the end, we chose to make our blocks from a selected range of colours. What you choose to do is up to you, but we selected plain colours for ours, as this will show off your different pieced blocks better in your sampler quilt.
You will need at least a ½ metre/yard of each fabric. We want a more modern looking quilt, so we chose 8 colours, ranging from a maroon, red, orange, yellow, charcoal, pewter, silver, to a very pale blue. We bought slightly more of each fabric, but this was just to piece a quilt backing from as well.
At the end, you will need also to add fabrics for the sashing and borders, but you can leave this until the final month, as you will not need them until then.
All blocks will start as 10 inch blocks. Please try to keep your seam allowances consistent, as this will make it easier to manipulate the blocks.
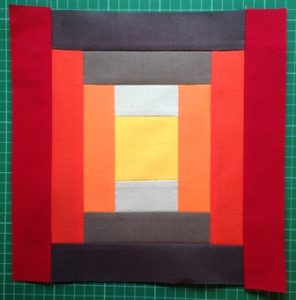
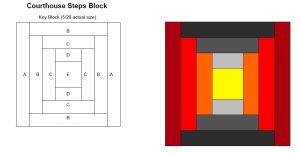
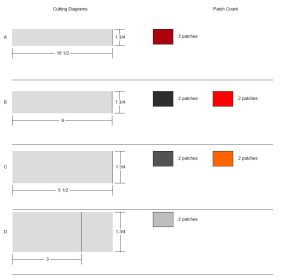
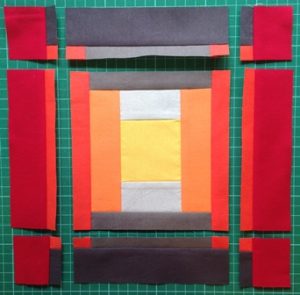
Block 2 – Courthouse Steps Block
You Will Need:
Seven (7) fabrics that contrast. We used maroon, red, orange and yellow, as well as charcoal, pewter and silver.
* You will need to make three (3) of these 10 inch Courthouse Steps blocks. Refer to the rotary cutting guide below for cutting directions and quantites for EACH block.
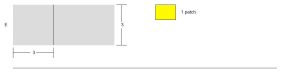
Cut:
Assembly:
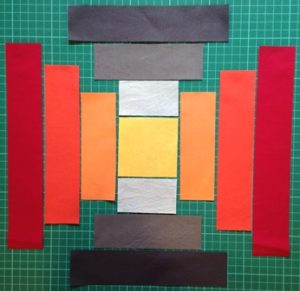
To make this block, lay out your strips as pictured.

Start in the centre, and join the silver strips to top and bottom of the yellow square.
Press seams.
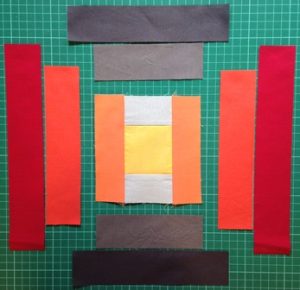
Next, add the orange strips to the sides.

Add the pewter strips to top and bottom.

Now join the red strips to the sides.

Add the charcoal strips to top and bottom.
To finish, add the maroon strips to the sides and press block well.
Make three (3) of these Courthouse Steps blocks.
By itself, this block makes some striking quilt designs:
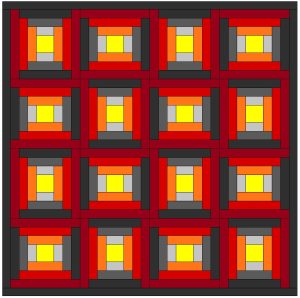

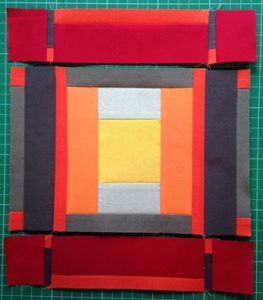
4-Patch:
And now let’s play! This block can also be cut into a 4-patch block, the units rotated, and re-pieced, for a completely different block.
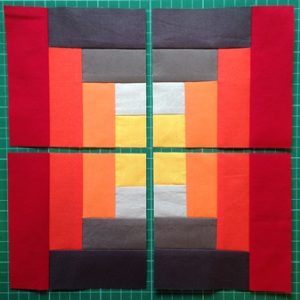
Cut one of your Courthouse Steps blocks into 4, as shown.
As your finished block should measure 10½ inches square, you should be able to cut in half vertically once at 5¼ inches, and do the same horizontally.
However – if your block is slightly out, don’t worry – make the cuts so they run straight through the centre square, so that each quarter is cut evenly to match the design.

You could rotate the quarters so that the maroon strips meet in the centre horizontally.
Or try this instead:
Rotate the quarters either quarter or half turns, so the maroon strips form a pinwheel shape in the centre.

Join the units into pairs and press seams so they face in opposite directions.

Join the pairs together to re-complete your block.
Also – as you have cut and re-pieced your 10½ inch block, the finished block will now be about a ½ inch smaller all round.
This is fine, and we will take it into account when we put the quilt together.
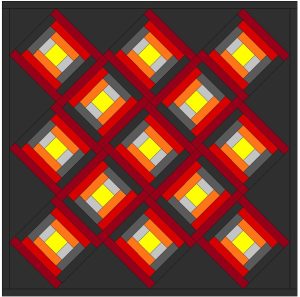
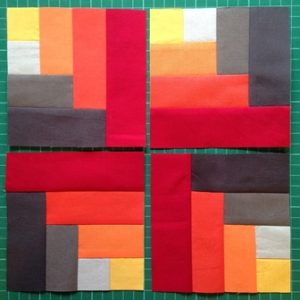
9-patch:
And don’t stop there! Now let’s try a 9-patch as well!!
This is not an even 9-patch.
Again, measure your block to double check, but you should be able to measure and cut 2 inch wide strips vertically from each side, and again horizontally, as shown.
Most importantly, make sure the cuts are even.

For this block, the only units that are moved are the long side strips.
Swap the side strips with the top and bottom strips, and rotate each of them, so the red and pewter strips face the outer edges.
(Maroon and charcoal will touch the centre unit.)
Carefully piece the units together into rows, and press so the seams alternate directions between the rows.
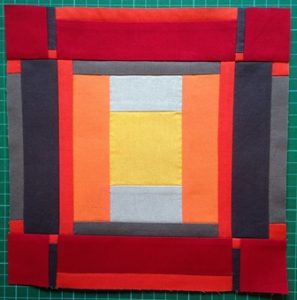
Finally join the rows together to reveal your new re-pieced 9-patch Courthouse Steps Block.
As before, this finished block will be smaller than your original block (approx. an inch), but we will take care of that when we assemble your sampler quilt top at the end of this project.
Before I go, I do need to address a concern that was raised about this quilt from last month too. It has been pointed out to me that one of the re-pieced blocks looks very like a swastika symbol. I do apologise for any concerns this may raise, but I would like to make it very clear that in no way would I ever include a swastika symbol in any of my quilts, and I certainly mean no offence to anyone by it.
This block was only included as it is more of a windmill style block – I believe the nazi symbol is reversed, and I took this version to be more of the traditional meaning of this symbol as divinity and spirituality.
If you would prefer to leave this block out of your sampler quilt, feel free to make two of another of our blocks along the way and simply replace it in the quilt when we come to the assembly stage.
I do hope you’ll continue to Explore Blocks with us, and I look forward to seeing your Month 2 blocks this month too!
Enjoy your week!

6 responses to “Exploring Blocks Sampler Quilt – Month 2”
Leave a Reply

Welcome to our
Online Quilt Magazine Blog
Read through to discover hints and tips, articles from magazine contributors, sneak peeks and more!
Please enter your email address in the box below to receive notification of
new posts by email.
Thank you
Like this Month 2 block. Where can I get Block 1?
Thanks Lucy! Block 1 is further back in our blog as it came out last month. Scroll back through the posts, or you can use this link instead – https://blog.onlinequiltmagazine.com/2023/07/25/exploring-blocks-sampler-quilt/
mmm.. the said cross is also an Irish cross, St Brigid’s Cross and symbol of the Brigidine Order of Nuns..
The Indonesian’s use it for weaving there ceremonial rice boxes..
Thanks Jan – that’s great to know!!
Well Jody I think it is a shame about seeing the Nazi symbol in many designs now. The media is directing us to the negatives. The Nazi didn’t “invent” this sign, they just used it from many historical designs. It is just a geometrical shape!