
Jelly Roll Throw Pillows
September 13, 2023

Hi!
Did you know that this coming Saturday 16th September is (US) National Sew a Jelly Roll Day? What better excuse then, than for this week’s post to be a couple of quick and easy patterns for Jelly Roll Throw Pillows!
These Jelly Roll throw pillows are designed to be fairly simple to make, and to use up those odds and ends of 2 1/2 inch strips that you may have tucked away in your stash. Best of all, there’s still a few days to go, so get busy now and you’ll be all set to decorate for the 16th!
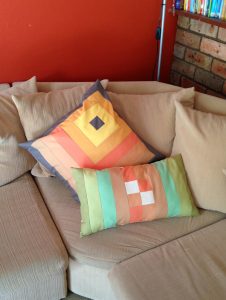
Modern Jelly Roll Throw Pillows
Looking for a quick, easy and super-fast project? Use up some 2½ inch jelly roll strips on these great modern cushions and jazz up your sofa this weekend. We liked plain modern colours for our pillows, but you can change them to suit your mood and décor as you like.
The square pillow is 16 inches x 16 inches, and the smaller rectangle pillow measures 20 inches long x 12 inches high.
We didn’t quilt ours, but this is always an option if you’d like to. It could be as simple as stitching in the ditch, and quilting the front often adds a pretty plumpness to throw pillows.
You Will Need:
Square Pillow –
A selection of 2½ inch (Jelly Roll) strips. We used 1 strip of each of 5 different colours, plus 2 strips of charcoal grey.
½ metre ( ½ yard) matching fabric for cushion back
Cushion insert to fit
Rectangle Pillow –
A selection of 2½ inch (Jelly Roll) strips. We used 1 strip of each of 7 different colours.
Piece of matching fabric measuring 20½ x 12½ inches for the pillow back.
Cushion stuffing. As we didn’t have an insert this size, we stuffed our pillow with toy stuffing. (Tip – Old batting scraps would work just as well.)
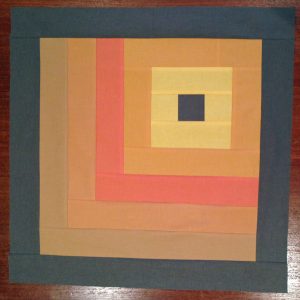
Square Pillow Piecing:

Cut:
A – 2 ½ x 2 ½ inches – Cut 1 grey
Cut 2 yellow
B – 2 ½ x 6 ½ inches – Cut 2 yellow
C – 2 ½ x 6 ½ inches – Cut 2 mustard
D – 2 ½ x 10 ½ inches – Cut 2 mustard
E – 2 ½ x 10 ½ inches – Cut 1 salmon
F – 2 ½ x 12 ½ inches – Cut 1 salmon
G –2 ½ x 12 ½ inches – Cut 1 peach
H – 2 ½ x 14 ½ inches – Cut 1 peach
I – 2 ½ x 14 ½ inches – Cut 1 light brown
J – 2 ½ x 16 ½ inches – Cut 1 light brown
K – 2 ½ x 16 ½ inches – Cut 2 grey
L – 2 ½ x 20 ½ inches – Cut 2 grey
Refer to the diagram and photo and start by sewing the three “A” pieces together with ¼ inch seams. Add the “B” strips, then the “C” strips and so on, until you have pieced the cushion top in order.
Press all seams well.
Assembly:
From the fabric for the back, cut two rectangles measuring 20 ½ inches x 15 inches.
Hem one full width (20 1/2inch) edge on each piece. Fold down the edge a ½ inch, then fold over again about 1 inch and pin and topstitch to hem that edge.
Lay the pieced square face up on a flat surface, then lay the two back pieces on top (with right sides down). Match all side edges, and overlap the two hemmed edges.
Pin and sew around all sides. Clip corners and turn right sides out before stuffing with a cushion insert to finish.

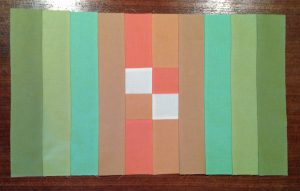
Rectangle Pillow Piecing:

Cut:
A – 2 ½ x 2 ½ inches –
Cut 2 cream
Cut 1 peach
Cut 1 salmon
B – 2 ½ x 4 ½ inches –
Cut 2 peach
Cut 2 salmon
C – 2 ½ x 12 ½ inches –
Cut 2 light brown
Cut 2 bright green
Cut 2 sage green
Cut 2 light olive green
Refer to the diagram and photo to piece this pillow top. Start with the centre and piece 2 “A” squares with a “B” strip either side. Sew them together, then add the “C” strips to either side in matching colour order.
Press all seams well.
Assembly:
With right sides together, sew the pillow back panel to the pieced top, making sure to leave at least a 6-8 inch gap along one of the long sides.
Clip corners and turn right sides out and press, before stuffing with your cushion stuffing. (Toy fill is great, or use the stuffing from another pillow.)
Tuck in the seam allowances along the gap and pin together. Use a matching thread to hand stitch the gap closed and finish your cushion.

And you’re done! As promised, two quick and easy jelly roll throw pillows, ready to add to your sofa or bed. I know this won’t have made much of a difference to your stash, but what’s not to love about new pillows in the house.
Make a few more if you’re so inspired – they make great stocking stuffers or secret santa gifts too!
Happy Sew a Jelly Roll Day!
Enjoy your week,

One response to “Jelly Roll Throw Pillows”
Leave a Reply

Welcome to our
Online Quilt Magazine Blog
Read through to discover hints and tips, articles from magazine contributors, sneak peeks and more!
Please enter your email address in the box below to receive notification of
new posts by email.
Interesante,pero la traducción no es asamblea sino ensamble,coser las telas,se puede decir ensamblar los rollys gel