
Woven Ribbon Cushion Pattern
November 11, 2023
Hi!
I do like giving hand made gifts at Christmas, and sometimes I like to try new things too, just to change it up a bit. I saw a picture years ago of a woven ribbon design, and thought a Cushion cover would be the perfect size project to have a play around and try this technique.
Having made this woven ribbon cushion now, it was so much fun, that I’m ready to mix it up even more with a bunch of different ribbons!
Gather your ribbons and have a play with some basic weaving, then turn it into a personalised cushion cover. Christmas ribbons would work great, and you can theme or colour-scheme this as much or as little as you like. (Think fancy print ribbons for a striped accent, or hand dyed soft colours for an ombre palette…???) You could even weave panels and use them in a quilt!
Here’s how I made mine:
Woven Ribbon Cushion Pattern
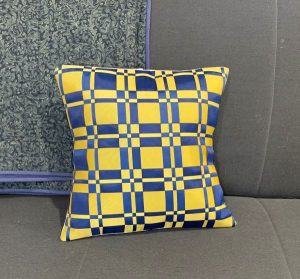
Our cushion cover measures approx. 14 inches square.
You Will Need:
1 metre / 1 yard plain fabric for the backing and back of the cushion cover
Selection of ribbons of your choice. Note – ribbons must be able to be ironed. We used grosgrain ribbon in navy blue and yellow, and got three different widths of each. The quantity of ribbon needed will vary depending on what size you make your pillow, and how many ribbons you want to use. We bought 3-4 metres / yards of each of our 6 ribbons to make sure we had enough.
Piece of fusible interfacing the size of your cushion cover. Ours was 14½ inches square.
Batting measuring 16 x 16 inches
Pins
Weaving:
Trim your fusible interfacing to the size you want your finished panel. (You can always go slightly larger and trim down when you have finished.)
Ours was 14½ x 14½ inches.
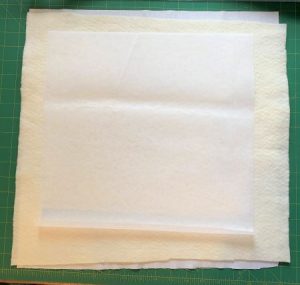
Cut a backing and batting bigger than this as you would for a quilt.
Layer the backing and batting, and then place the fusible interfacing on top with the fusible (shiny) side up. When you have finished weaving, you will fuse the ribbons to the interfacing to hold it all together.

Cut ribbons in lengths to suit.
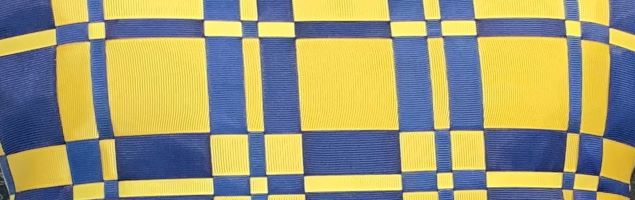
We cut our blue ribbons to measure just over 14½ inches long. We wanted a plaid effect, so our blue ribbons were all running vertically, and we decided to weave our yellows horizontally.
Work out an arrangement of thick and thin ribbons so that they cover the piece of fusible interfacing. A repeated pattern will help with the plaid effect.
Pin across the top to secure the ribbons to the fusible, batting and backing.
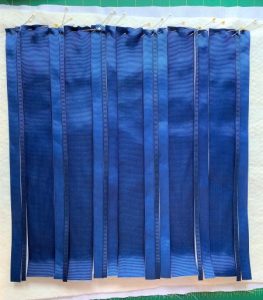
Our arrangement of vertical ribbons, using thick, medium and thin sizes.

Cut yellow ribbons the same length as your blue. We had the three thicknesses of yellow ribbons as well.

Start weaving. Thread your yellow ribbon over and under the blue strips.
Slide it right to the top and pin each end to anchor it in place.

Keep weaving more ribbons, alternating the over and under order between each row.
Work out the order of your yellow ribbons too (same as the blue), for a nice even plaid.
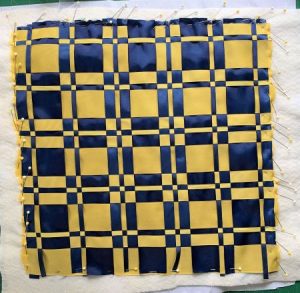
Weave your way to the end, so that the fusible interfacing is completely covered.
You may need to adjust your ribbons from time to time, and unpin and move them up, to keep them tight against the previous row so there are no gaps at the overlaps.
When you are happy, use your iron to carefully fuse the ribbons to the fusible interfacing. Don’t melt your ribbon!

Sew a seam around all edges, (removing the pins as you go) to hold all of your ribbons and ends securely.
You may like to quilt yours too. It could be as simple as following some lines, or you may like to add a motif or allover design.

Trim to square up.
Assembly:

Our cushion cover had a simple overlapped fabric back.
From your backing fabric, cut two rectangles measuring 14½ x 9 inches.
(Adjust for your pillow size if necessary. The width is the same as your square ribbon panel, and you need to allow at least a 5-6 inch overlap of the back panels.)
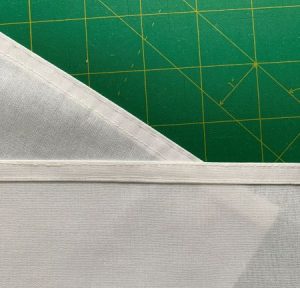
Fold under one long edge twice and press. Do this for each of the two panels.
Sew the hem in place. You may like to also topstitch along the edge to finish and flatten these seams neatly.
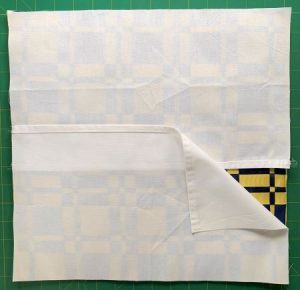
Lay your cushion front face up on a flat surface.
Place the panels face down on top as shown, so that the raw edges are all lined up around the edges and the backing panels overlap.
Pin.
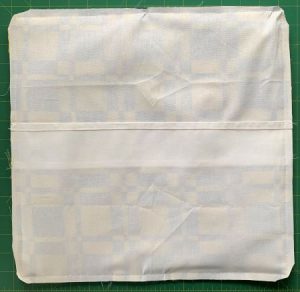
Sew around all four sides and trim the corners to remove some bulk from the seam allowance.

Turn right sides out and find a cushion insert to fit, and you’re finished!
Ta dah! I hope you liked this tutorial, and that you’re now off to find some ribbons and an offcut of batting…
We’d love to know what you think about this technique, and if you have a go at this woven ribbon cushion yourself, please do send me a photo!
Enjoy!

10 responses to “Woven Ribbon Cushion Pattern”
Leave a Reply

Welcome to our
Online Quilt Magazine Blog
Read through to discover hints and tips, articles from magazine contributors, sneak peeks and more!
Please enter your email address in the box below to receive notification of
new posts by email.
What a beautiful project to complete, thank you for sharing. I can see so many options for colour streams.
Please do share some photos if you do! I’d love to see it in some different colourways.
Absolutely gorgeous and different. Congrats, Jody, you’re a STAR.
Glad you liked this one!
This looks interesting – I will have to try it!
Remember to share photos if you do!!
love it!
Sometimes it’s fun to do things a bit differently. I’m on the hunt for some new ribbons now… 🙂
Really good/// I have done some weaving but not put it into anything except mats
I think these would make great placemats or table mats. You could put woven panels in a runner, or even a quilt…