
Christmas Potholders Pattern
November 14, 2023

Hi!
I decided to finish this run of quick Christmas projects with a quilted project that is both really handy to have, and fun to make.
Yes – I’m talking about Christmas Potholders! OK, so I will agree it’s not an especially sexy quilted project, but potholders are one of those things that every house just has to have, and if you can make your own pretty ones, then that’s got to be a plus!
And better still – they make great gifts (especially for the person who seems to already have everything), and they are a lovely way to show your appreciation as hostess gifts, or for that work or guild Christmas Secret Santa present you need to find….
I used some pretty Scandi prints for my Christmas Potholders, and I actually don’t mind if we use them all year!
Here’s my Christmas Potholders – two ways:
Christmas Potholders

Why not whip up a quick potholder or two for this festive season? Whether for your own use, or as a quick gift for your holiday hostess, these two different potholders are quick and easy to make, and are a great way to use up those last few fabric scraps too.
The simple potholder (left) is 7 x 9 inches, and the star potholder (right) is 7 ½ inches square.
You Will Need:
Simple Potholder:
A small amount of plain stone coloured fabric for the binding
Small Amount of three bright red and white print Christmassy fabrics
Small amount (equivalent to a Fat Quarter) of insulated batting. (We used Insul-fleece, but there are other brands available. If you do not have any, regular cotton batting will be OK.)
Star Potholder:
Small amount of two bright red and white print Christmassy fabrics. (We used a white one with small red stars, and red one with a white design for a good contrast between the two.)
Small amount (equivalent to a Fat Quarter) of insulated batting. (We used Insul-fleece, but there are other brands available. If you do not have any, regular cotton batting will be OK.)
To Make:
Simple Potholder
From print fabric A, cut one rectangle measuring 7 x 9 inches
From print fabric B, cut one rectangle measuring 7 x 9 inches
From print fabric C, cut two squares measuring 7 x 7 inches
From the batting cut two rectangles measuring 7 x 9 inches, and one square measuring 7 x 7 inches
From the stone fabric cut approx. a 40 inch strip (width of fabric) 2¼ inches wide for binding

To start, layer the print fabric B rectangle face down on a flat surface, then add two layers of batting, and finally fabric print A face up on top.
Pin layers together and quilt in a 1 inch diagonal grid. If you have a walking foot, use it for this quilting.
Layer the remaining fabric squares (print C) with one square of batting and quilt in a 1 inch diagonal grid also.
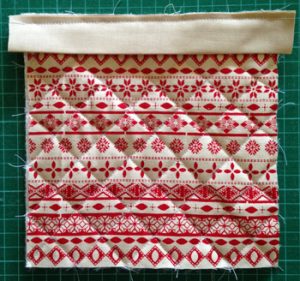
As pictured, on the right side, sew a strip of binding to the top edge of the quilted 7 inch square.

Fold over to the wrong side and pin. Then carefully topstitch in the ditch along the binding on the right side, to catch the binding securely on the back.

Place the 7 inch square on the quilted rectangle, matching the side and bottom edges.
Trim to slightly round the corners of your potholder.
Pin and sew together with a scant seam down the sides and across the bottom.
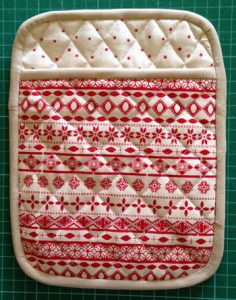
As before, sew the binding to the top side (as shown, with the hand pocket facing up) with a ¼ inch seam.
Cut a 5 inch strip of binding for the loop. Open it out and fold in each side to meet the centre crease before re-folding, so you have 4 thicknesses of fabric. Topstitch around all sides.

Fold the loop in half and pin to the back of the Christmas potholder in the centre of the top edge as pictured.
Fold the binding to the wrong side and pin, then sew in the ditch from the right side to secure it, and the hanging loop.
Star Potholder:
From the mostly red print fabric, cut:
One square, 3 x 3 inches
Two squares, 3.7/8 x 3.7/8 inches
Two squares 7 x 7 inches
A 50 inch strip 2¼ inches wide for binding
From the mostly white fabric, cut:
Four squares, 3 x 3 inches
Two squares, 3.7/8 x 3.7/8 inches
One square 7½ x 7½ inches
From the batting, cut:
Two squares 7½ x 7½ inches
One square 7 x 7 inches

First, piece the Friendship star on the front of this potholder.
Place one white and one red 3.7/8 inch square right sides together and mark the diagonal line with a pencil.
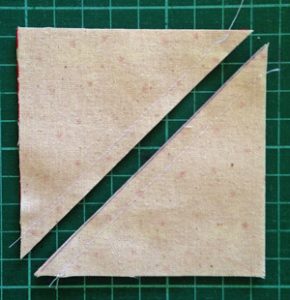
Sew ¼ inch to either side of that line, then cut on the line to make two half square triangles.
Open out and press, and repeat for the remaining pair of 3.7/8 inch squares.
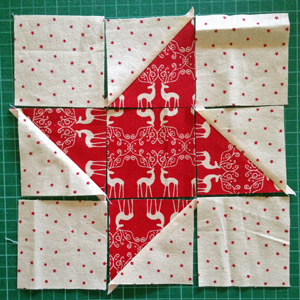
Arrange with the 3 inch squares to make your Friendship Star block as shown.
Sew together in rows, then piece the rows to make your block. Press well.
The back of this potholder has two triangle pockets for your thumb and fingers.
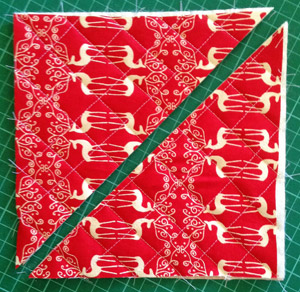
Lay one of the red 7 inch squares face down, place the 7 inch square of batting on top, then the remaining red square face up. Pin and quilt in a 1 inch diagonal grid.
When quilted, cut in half once on the diagonal as pictured.

Now quilt the front. Layer the white backing, two layers of batting and the pieced star on top. Pin and quilt – we echo quilted a ¼ inch outside the star, and a ½ inch inside the star, and sewed around the edges to hold the layers together.
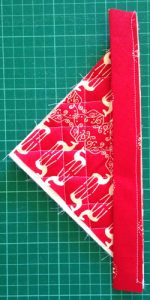
On the right side, sew a strip of binding to each of the back pocket triangles, as shown.


Fold the binding to the back, pin and stitch in the ditch along the binding to catch the other side at the back and secure it.
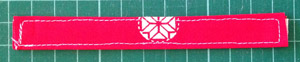
Cut a 5 inch strip of binding for the loop. Open it out and fold in each side to meet the centre crease before re-folding, so you have 4 thicknesses of fabric. Topstitch around all sides.
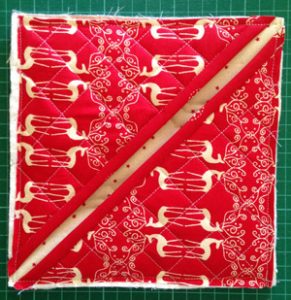
Position both back pockets on the wrong side of the quilted star panel and sew together around the outer four edges with a scant seam to secure.

Sew the binding to the right side with a ¼ inch seam.

Fold the loop in half and pin to the back of the potholder angling down parallel with one side of the pocket as pictured.
Fold the binding to the wrong side and pin, then sew in the ditch from the right side to secure it, and the hanging loop.
And there you have it! Two different Christmas potholders ready to go (and waiting for a workout on your Christmas dinner)!
I hope you like this pattern idea too, and as always, please leave a comment below with your thoughts on this project.
Enjoy!

(Cover image designed by Freepik)
6 responses to “Christmas Potholders Pattern”
Leave a Reply

Welcome to our
Online Quilt Magazine Blog
Read through to discover hints and tips, articles from magazine contributors, sneak peeks and more!
Please enter your email address in the box below to receive notification of
new posts by email.

Thank you for these idea , good for the small that can been given .
Love them. ❤️ going to make ASAP.thanks .
Pot holders my favourite go to project. Now all I need is to not have to translate!!
I think the best way is to make the pot holder for visual refference and have cardboard template for the measurments and then give the templates letters, names and quantity.
That would work Ethel. Send me some photos when you’ve all made them!
thank You Cute!!
This looks quick and easy. Thank you.