
Bonus Pattern – Easter Egg Reverse Applique Mini Quilt
March 13, 2024
Hi!
With Easter only about 2 weeks away, it’s time to get your quilty decorating done, and this week, I thought you might like a fun little Easter Egg applique quilt project to make. There’s plenty of time to make this, so raid your stash and rifle through your scrap basket and enjoy some slow stitching…. (or chocolate will make you stitch faster! 🙂 )
Easter Egg Reverse Applique Mini Quilt
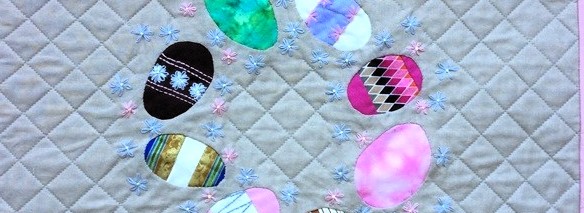
It’s nearly Easter again, and this egg-themed mini quilt will be perfect to use on a wall or a table. The technique we’ve used is reverse applique, and these simple eggs are great to practice this skill on. Add a few simple embroidered Easter daisies, and you’re all set!
As always, it’s up to you with what you’d like to use this little quilt for – keep it as a wallhanging mini quilt (framed, or bound), use it as a fun table topper, or perhaps you’d like to turn it into a quilted throw pillow cover instead!
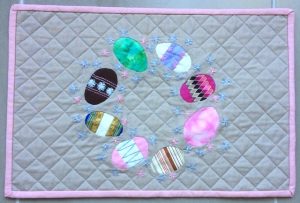
This mini quilt measures 18 inches wide x 12 inches high.
You Will Need:
Background fabric measuring 19 x 13 inches. (We used a plain stone colour)
¼ yard/metre pale pink fabric for binding
Small pieces of assorted coloured fabrics with stripes or spots as you wish, for the eggs.
Embroidery floss in pink, pale purple and yellow for the flowers. (And other colours of thread to decorate the eggs as you wish.)
Thread to match your background fabric
Batting measuring at least 19 x 13 inches*
Backing fabric measuring at least 19 x 13 inches*
* Note – these measurements are to make our size mini quilt. If you’re making yours larger, or turning it into a cushion cover, please allow extra fabric for the rest of the project.
Reverse Applique:

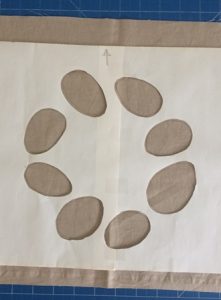
Print out the attached templates and join the two sheets as indicated by the dotted lines.
You can download the full pattern from: https://www.onlinequiltmagazine.com/members/content/f/id/1166
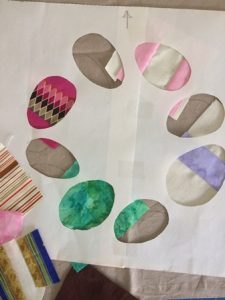
Carefully cut out each of the eight egg shapes, as shown.
Lay the paper with cut out egg shapes on to the middle of the right side of your background fabric rectangle, and draw a pencil line on the fabric approximately 1/16 inch inside each of the cut out shapes.
(The pencil lines will be hidden later.)
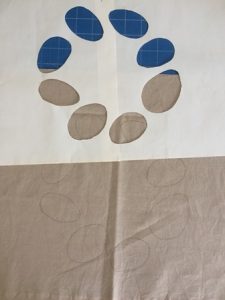
Your pencil drawn egg shapes on the background fabric.

Now comes the fun part!
Make 8 different egg patches from your assorted fabrics.
We used some stripy printed fabric, as well as pieced some contrasting colours in simple stripes.
The little egg “patch” will go behind the egg shapes you will EVENTUALLY cut out of the background fabric rectangle.
Make sure the egg patches are big enough to extend beyond the egg shapes. You can trim them later.
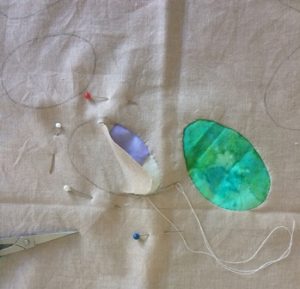
Pin an egg patch behind the chosen egg shape, and snip just inside the pencil line for no more than ¼ inch. SNIP ONLY A LITTLE WAY AHEAD OF YOUR TURNING UNDER AT A TIME.

Using thread matching the background fabric, and the point of your needle to help you turn under the scant seam allowance of the background fabric, and sew in place with tiny stitches as shown, through the egg fabric and the tucked under background fabric.
Clip a little more, and work your way around the egg shape. When you’ve gone right around the egg, the background fabric will be gone, and you’ll be left with a reverse appliqued egg!
You can trim the excess egg patch fabric from the back as you finish each one. Reverse applique all 8 eggs.
Embroidery:
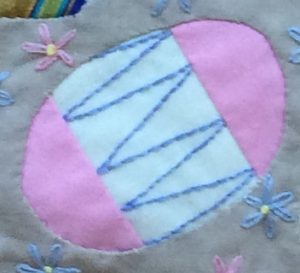
We decorated several eggs with simple backstitched stripes.
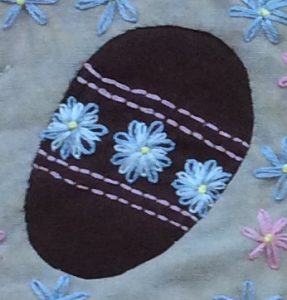
For the chocolate egg, we also added 3 double lazy daisy Easter Daisies in purple and white.

We then sprinkled other purple and pink daisies randomly around the eggs.
They are made with 2 strands of floss, using the lazy daisy stitch, and with a yellow Colonial Knot in the centre of each.
Each flower is marked in a circle on the template pattern. Don’t sew a circle; do lazy daisy stitches as shown.
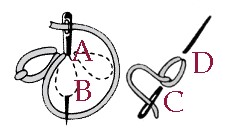
The lazy daisy stitch.

How to do a colonial knot.
Quilting:
Press your panel on the back before layering for quilting.
Place your backing fabric face down on a flat surface, then smooth the batting on top. Put your top on top of that, centred and smoothed flat. Pin the layers together in preparation for quilting.
We chose to quilt ours with crossing diagonal lines spaced 1 inch apart, but you may quilt yours as you’d like.
Trim to measure 18 inches x 12 inches (for our table mat size).
Finishing:
If making your Easter Egg Applique Quilt as a mini quilt to hang or use as a table topper, cut binding strips 2¼ inches wide and join together with 45 degree seams. You will need about 70 inches. Press the ¼ inch seams open, then fold the strip in half, right sides out and press.
Join the binding to the right side of the quilt edge with a quarter inch seam, mitring each corner as you go. Turn the folded edge of the binding to the back and slip stitch it in place with thread that matches the binding to finish. Add a suitable rod pocket to hang it.
If you are using your mini quilt as the quilted front of a throw pillow cover, then add the back half of the cover (two large overlapping rectangles the width of your top and 2/3 as long will be sufficient), and finish.
Ta dah!
Remember to download the full pattern from: https://www.onlinequiltmagazine.com/members/content/f/id/1166
Then get cracking (!?!) and you’ll have your Easter Egg Applique Quilt finished in plenty of time.
Enjoy your week!
Regards,

6 responses to “Bonus Pattern – Easter Egg Reverse Applique Mini Quilt”
Leave a Reply

Welcome to our
Online Quilt Magazine Blog
Read through to discover hints and tips, articles from magazine contributors, sneak peeks and more!
Please enter your email address in the box below to receive notification of
new posts by email.
I’m not good at hand-work. I am wondering if I could use this method and use my sewing machine to stitch the eggs on?
Hi Judy! I don’t see why not. If you still want to reverse applique, either tuck under and glue baste the edges first, and then topstitch around the egg shape, or it would be easiest to just cut out the egg shape, put the coloured fabric behind and zig zag or satin stitch around the edge. That should work fine.
great idea! Thank you to whoever created this pattern
Thanks! Glad you like it, and please do send us through a photo of your finished project so we can include it in our magazine “Show and Tell”.
Thank you so much for this pattern. It is exactly what I have been looking for. Perfect!
That’s great to hear! Enjoy!!