
Exploring Blocks Sampler Quilt – Month 10 to Finish!!
April 24, 2024
Hi!
I’m so excited to be able to bring you the final instalment of our Exploring Blocks Sampler Quilt today!! I know you’ve been working hard on these assorted blocks over the past months, and although we’ve seen some blocks from some of you that have been joining in on this project with us, I know there’s still more out there, and we’re so excited to see your quilts after this month.
In fact, I’d love to be able to have a special “Show and Tell” of your Exploring Blocks Sampler Quilts in the Online Quilt Magazine too! Let’s say that completed tops is quite OK (and of course, quilted and bound if you have the time), and if you’re anything like me, a deadline makes the work happen. In that case, you have until the 15th June to email me a photo of your quilt / quilt top, and we’ll do a special “Show and Tell” in the magazines in July. Deal? Remember my email is jody@onlinequiltmagazine.com , and I look forward to seeing what you’ve made.
OK, so without further delay – Let’s Get Started!!!!!
Exploring Blocks Sampler Quilt
This month we’re finally finishing all blocks, assembling and completing our quilt! It is quite amazing just what you can make from 9 classic quilt blocks, and we hope you love your sampler quilt just as much as we love ours!
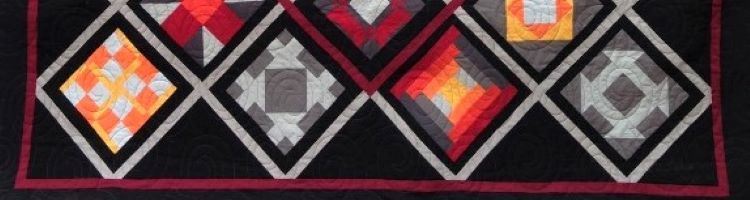
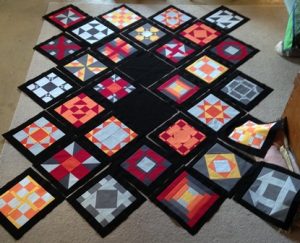
There are a couple of layout options, depending on the size quilt you want, but we chose a stunning on-point layout for ours.
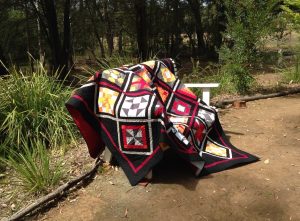
As a reminder – here’s ours. You can refer to this as a guide as you wish.
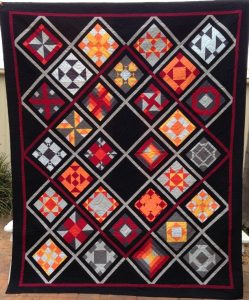
Our finished quilt measures approx. 82 inches wide x 100 inches high.
To Finish This Project As We Did, You Will Need:
Your 30 pieced blocks from the previous 9 months
5 metres / 5½ yards plain black fabric
1½ metres/ 1¾ yards plain light grey fabric
1½ metres/ 1¾ yards plain burgundy red fabric
Backing measuring at least 86 x 106 inches. (We pieced our backing using all the left over fabrics from the blocks.)
Batting measuring at least 86 x 106 inches.
Blocks:
And this is where the rest of the magic happens…
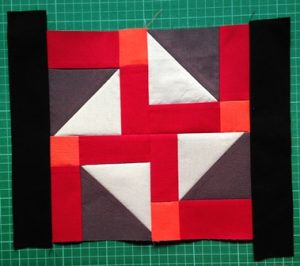
Before you can assemble your quilt, you need to first get all blocks up to the same size. To do this, we added a black border to each block, and trimmed them to measure 12½ x 12½ inches square.
Cut:
From the plain black fabric, cut –
42 strips measuring 2 inches x 11 inches
42 strips measuring 2 inches x 14 inches
18 strips measuring 2½ inches x 11 inches
18 strips measuring 2½ inches x 14 inches
Note – The 18 strips that are cut 2½ inches wide are for the nine, 9-patch blocks that you have made.
As shown above, sew a shorter length strip to either side of your blocks, and press well. (These strips are longer than required.)

Trim to square up the sides.
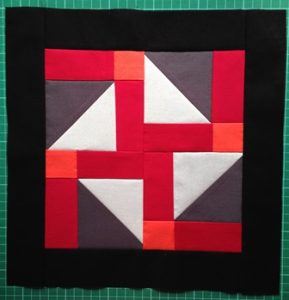
Add the longer strips to top and bottom and press well.
Trim to square up each block so it measures 12½ x 12½ inches square.
Do this for all 30 of your pieced blocks.
Now cut the following:
From the plain black fabric, cut:
9 squares measuring 12½ x 12½ inches. Keep 2 and cross cut 7 once diagonally to make 14 large triangles.
1 square measuring 13 x 13 inches. Cross cut twice diagonally to give you 4 small triangles.
From the light grey fabric, cut:
36 x “A” strips, measuring 1½ x 12½ inches
4 x “B” strips measuring 1½ x 14½ inches
4 x “C” strips measuring 1½ x 40½ inches
3 x “D” strips measuring 1½ x 51 inches
From the plain burgundy fabric, cut:
2 lengths measuring 1½ x 51 inches
2 lengths measuring 1½ x 53½ inches
Assembly:

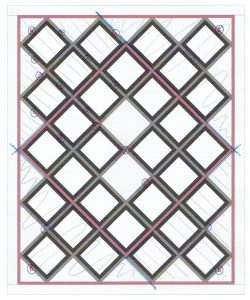
This quilt is assembled with the blocks on point, with two plain black squares in the centre and black triangles around the edges.
There is a thin burgundy red sashing border making a diamond shape around the centre blocks.
This quilt is assembled in 5 main sections.
Referring to the photos and layout diagram below, lay out your blocks as you like, keeping the two plain black blocks in the centre.

To start, piece the centre. Although the centre finishes on-point, you can sew it together as a square unit.
Use three “A” grey sashing strips to join the blocks in each row in sets of four, with one sashing strip between each block.
Press well.
Use the three light grey “D” strips to join the rows together into a 4 x 4 grid, and press well.
Finally add the two shorter burgundy strips to each side and press, then add the longer burgundy strips to top and bottom to finish.
Press well.
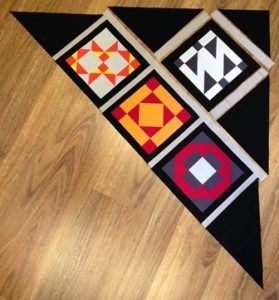
The top right and bottom left corners are pieced as large triangle units.
Use 4 “A” grey sashing strips to join the row of three blocks together, as pictured. Use 2 “A” strips for either side of the single top row block.
Sew, and press well.
Add a large black triangle to either side of the row of three blocks, then sew a “C” grey strip across the top.
Add a further two large black triangles to either side of the top row block, and sew one “B” sashing strip across the top. Add one small black triangle to the top to make the corner point.
Press all well and then join the rows together to finish the corner unit.
Trim to square up sides.
Make both units for the two corners. (Top right and bottom left.)
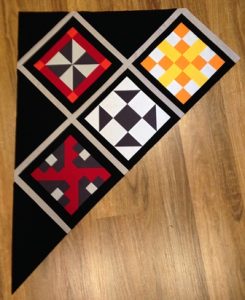
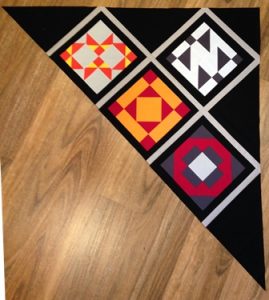
The top left and bottom right corners are made in much the same way, but they are each missing a black triangle on one side.
As you did for the other corners, sew the blocks together in rows with sashing and triangles as needed.
Press well, then join the rows with a grey “C” strip.
Use a grey “B” strip across the top of the single block, and add a small black triangle to make the corner.
Join rows and trim to square up sides.
When you have pieced these 5 units, sew them together. Add the top left and bottom right corners to the centre square first, then join the top right and bottom left large triangle units to finish the centre of your quilt.
Press well.
This is the quilt layout diagram, with the black centre square and outer triangles in grey, so you can read the letters more clearly. The blue lines show the separate sections pieced as units first, before joining them all together.
Borders:
There are two borders added to this quilt – a thin burgundy red one, and a wider black one to finish. You will have to join strips to get the length required for these borders.
** Measure your quilt top before cutting the borders to size, or you may choose to do as we did, and cut them longer. Sew them on being careful not to stretch the quilt top, then trim the excess from the end.
From the burgundy fabric, cut:
2 strips measuring 1½ x 78 inches
2 strips measuring 1½ x 96 inches
Add the longer strips to either side and press, then sew the shorter strips to top and bottom, and press well.
From the black fabric, cut:
2 strips measuring 4 x 83 inches
2 strips measuring 4 x 103 inches
Again, sew the longer strips to each side and press, before sewing the shorter strips to top and bottom to finish.
Alternate Layouts:
There are some other options for your Exploring Blocks Sampler Quilt layout if you’d prefer:
Our quilt is quite large and will fit a queen sized bed.
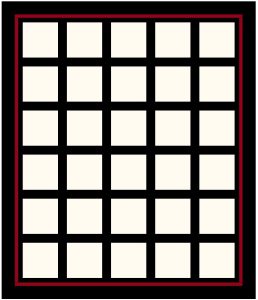
If you would prefer a smaller quilt, you can always lay the blocks out in a 5 x 6 grid.
Make your blocks all up to 12½ inches square.
This layout has no sashing – the blocks are all just joined together, with the two borders added.
This quilt will end up about 62 x 74 inches in size, depending on the width of your borders. This size will suit a single bed.
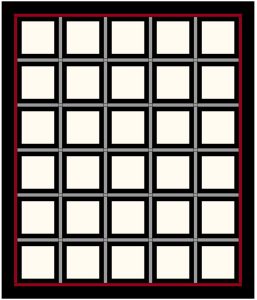
Or, you may choose to add grey sashing between your blocks.
Cut sufficient “A” grey strips to add between the blocks, with longer strips to join the rows together.
A quilt with sashing like this will measure about 66 x 79 inches.

Or, you may like to add the splash of burgundy red in the middle too, and change some of your grey sashing to red.
Again, you can piece the centre unit first and add the burgundy sashing as long strips, then add the two pieced sides and the pieced strips across top and bottom.
This quilt will be about 66 x 79 inches in size.
Quilting:
Place your backing fabric face down on a flat surface, then smooth the batting on top. Put your quilt top on top of that, centred and smoothed flat.
Pin the layers together in preparation for quilting.
As our quilt was large, we decided on a simple longarm quilting edge to edge spiral design. This would be a great quilt to custom quilt however – you could quilt each block separately with motifs to suit, but this decision is up to you.
Finishing:
Cut sufficient 2¼ inch binding strips from the remainder of the plain black fabric and join together with 45 degree seams. Press the ¼ inch seams open, then fold the strip in half, right sides out and press.
Join the binding to the right side of the quilt edge with a quarter inch seam, mitring each corner as you go. Turn the folded edge of the binding to the back and slip stitch it in place with thread that matches the binding to finish.
And there you have it!
I do hope you’ve enjoyed this quilt along with us, and that you will continue exploring quilt blocks, and playing around with how they’re constructed.
Remember to at least get your top finished and send me through a photo before the 15th June, so we can include it and show off your hard work in a special feature in our July Online Quilt Magazines.
Ready, Set, Go!!!
Enjoy your week,

2 responses to “Exploring Blocks Sampler Quilt – Month 10 to Finish!!”
Leave a Reply

Welcome to our
Online Quilt Magazine Blog
Read through to discover hints and tips, articles from magazine contributors, sneak peeks and more!
Please enter your email address in the box below to receive notification of
new posts by email.
Thank you for the finishing directions. They are wonderful. Now where can I find all the blocks and their directions?
Thanks Judy. All previous blocks for this quilt are here on the blog – we’ve done one each month, so keep scrolling back through past blog posts and you’ll find them all in order as you go.