
How To Create Stained Glass Quilts
May 1, 2024
Hi!
Today we’re reprinting an article we published several years ago in the Online Quilt Magazine with a quick ‘how to’ for piecing stained glass quilts. Do any online search on ‘stained glass quilts’ and you’ll see a wonderful variety of designs – from simple repeated blocks, to whole-quilt artistic designs, and while there’s a few ways of tackling the construction of these blocks and quilts, the same general principles apply.
This article from Jan Meyers looks at a method using fusible interfacing as a foundation, and freezer paper.

“You may have noticed that stained glass quilts are growing in popularity. These look complex to create but following some simple guidelines will have you mastering this part of quilting in no time!
You will need to select your pattern for the project. If you haven’t made one of these quilts before, it may be best to actually use a pattern that is specifically for stained glass quilts for beginners.
There are many different types and colors of fabrics to select from when making stained glass quilts. It is best to use fabrics that do not have fine details and patterns within them since you want the finished product to look like a piece of stained glass. Many people find that Muslin fabrics work well for the foundation fabric.
Once you’ve selected the pattern, position it in the middle of an appropriately sized piece of woven fusible interfacing. It is best to avoid the fusible web because it can tend to make your project too stiff.
Trace just the design without the numbers onto the fusible area of the interfacing.
Get a large piece of wax or freezer paper that will fit the design. Trace the design onto the paper, again without numbers.
Using sharp scissors, you will need to cut the design out following the lines you just traced onto the paper.

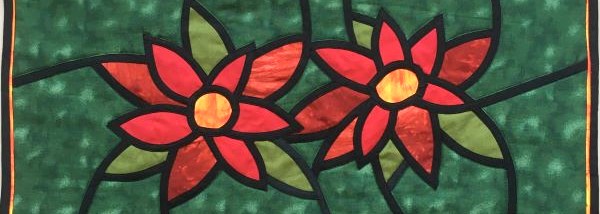
(Image from https://www.etsy.com/au/listing/833376051/stained-glass-mosaic-or-quilt-pattern)
Place all the appropriate freezer paper pieces on the different color fabrics. Make sure to place with the shiny side of the paper down.
Iron the sections onto the fabric. You will then need to cut the design pieces out leaving a 1/16″ additional edge border around each piece. Don’t cut the pieces flush or you will not have enough to go under the ‘lead’ overlay fabric.
Now that all your pieces are cut, you will need to remove the paper backing. Set the pieces out onto the foundation fabric.You will want to use the lines you traced out on the interfacing foundation for positioning.
Partly overlie the appliqué sections a little. You do not want to leave any openings. Once this is complete, you can use a pressing sheet to iron the appliqué sections to the fusible interfacing. (Make sure to check the manufacturer’s instructions when doing this part of the process for this part of your stained glass quilts.)

You now need to cover the edges of the applique pieces with bias tape so that the edges of the tape completely cover the other sections that are laid down.
Use thread that matches the bias tape (this is usually black, like a stained glass window) to stitch along each side of the tape. Use a backstitch to lock the starting and ending portions of the bias tape. Be certain to trim the thread ends close to the surface for a neater appearance on your stained glass quilts.

A nice addition is to add additional bias to the border pieces. With stained glass quilts, you will have ‘leading’ at any area the glass is a different color or piece.
It is important to quilt the fabrics around the bias ‘leading’ in order to make it extra noticeable. Following these general guidelines should have you creating beautiful stained glass quilts with confidence.”

Do think about giving a stained glass quilt a try – they are easier to make than they often look, and they really do have that ‘Wow!’ factor when finished. Do let us know if you’ve made one, and what you thought about the process.
Enjoy!

2 responses to “How To Create Stained Glass Quilts”
Leave a Reply

Welcome to our
Online Quilt Magazine Blog
Read through to discover hints and tips, articles from magazine contributors, sneak peeks and more!
Please enter your email address in the box below to receive notification of
new posts by email.
Maybe I will try this after I tackle a decoupage quilt piecing project. They will both be new to me.
I’ve made a few of these. They are quite striking when done. I even made an Easter banner for my church. There are (were?) different widths of black bias tape. I like the narrower (3/16) width.